Configuring the flash unit for wireless flash photography
This flash unit supports radio wireless communications for flash photography. Configure the flash unit that you attach to a camera as the commander unit; and the flash unit of which flash operation is wirelessly triggered as the receiver unit (off-camera flash unit).
Hint
-
To perform radio wireless flash photography, you need to pair the commander unit with the receiver unit in advance.
To configure the flash unit as the commander unit
- Turn the power switch on this flash unit to “ON.”
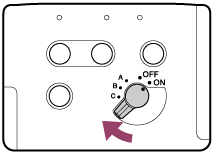
- Work with the menu of the camera attached with this flash unit to specify [On] for [Wireless Flash].
The CMD lamp on the flash unit lights.
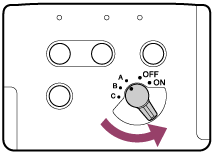
To configure the flash unit as the receiver unit
Turn the power switch on this flash unit to “A,” “B,” or “C.”
For details about the flash unit settings and wireless flash photography, see “Wireless flash photography (with the receiver unit).”
Hint
-
The radio wireless communication distance available between the commander unit and the receiver unit is approximately 35 m (114 ft.). (Acquired under our measurement conditions.)
-
Select [External Flash Set.] - [Ext. Flash Cust. Set.] - [Commn. Channel] from the menu of the camera attached with this flash unit, and then specify the channel to use for radio wireless communications. By default, [Auto] is specified for the communication channel and a channel appropriate for the ambient radio conditions at the time that you turn on this flash unit is used.
-
When this flash unit is configured as the commander unit for radio wireless photography, the TEST button lights in orange as soon as all the flash units, including the receiver units, become ready to fire.