Mounting the speaker on a wall
- Have the installation done by a Sony dealer or licensed contractor and pay special attention to safety during the installation.
- Prepare the wall mount bracket (not supplied) and screws (not supplied) that are suitable for the wall material and strength when you mount the unit on the wall. As a plasterboard wall is especially fragile, attach the bracket and screws securely in the wall beam. Install the speakers horizontally, hung by screws in studs in a continuous flat section of the wall.
- Sony shall not be held responsible for accidents or damage caused by improper installation, insufficient wall strength, improper screw installation or natural disaster, etc.
- Keep enough space behind the unit when you mount the unit on a wall. If you use the HDMI ARC TO port, USB-A port, USB-B port, or AUDIO IN jack, adjust the space between the wall and the unit to avoid touching a connecting cable or USB flash drive to the wall.
- When connecting a bar speaker mounted on a wall to the HDMI ARC TO port, use a High-speed HDMI swivel cable.
- If the wall mount bracket (not supplied) is not found at your nearest store, ask to the Sony dealer or store where you have purchased this unit.
-
Prepare screws to match to the screw holes for wall mounting on the rear of this unit.
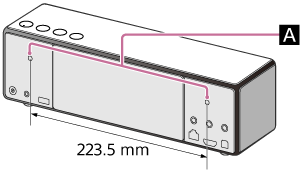

 : Screw hole
 : 1/4 inches
 : 12 mm (15/32 in) or longer