Parts and Controls (Remote Commander and Control Panel)
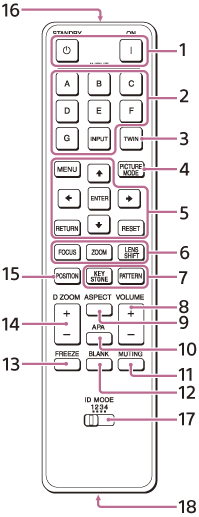
Remote Commander
Control panel
-
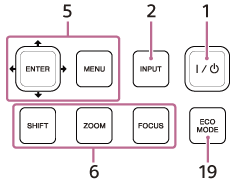
 (On) key /
 (Standby) key
Turns on the power and goes to standby. -
INPUT (Input selection) key/Direct input select keys
Selects the input. Select the Video (VIDEO IN) with the INPUT (Input selection) key. The E, F, and G keys are not used with this projector. -
TWIN (Twin picture) key
Not available for this unit. -
PICTURE MODE key
Switches the [Picture Mode] setting. -
MENU (Menu) key
ENTER (Enter)/ /
/
 /
/
 /
/
 (Arrow) keys
RETURN (Return) key
RESET (Reset) key
Perform menu operations, etc. -
FOCUS (Focus) key
Used when the electric focus lens is attached.
ZOOM (Zoom) key
Used when the electric zoom lens is attached.
LENS SHIFT (Lens shift)/SHIFT (Shift) key
Adjusts the position of the image. -
PATTERN (Pattern) key/KEYSTONE (Trapezoidal correction) key
Used for adjusting the projected image. -
VOLUME (Sound volume) +/- key
Adjusts the volume output from the audio output terminal. -
ASPECT (Aspect) key
Switches the aspect ratio of the projected image. -
APA (Auto pixel alignment) key
Adjusts the input signal to fit to the screen automatically when there is a computer signal being input from the RGB input terminal (Input A). Pressing the APA key once more during adjustment will cancel the adjustment. -
MUTING (Mute) key
When sound is output, temporarily mutes the audio. Press again to release. -
BLANK (Eliminate image) key
Temporarily turns off the projected image. Press again to release. -
FREEZE (Freeze) key
Pauses the image. Press again to release. This can be used when there is a computer signal being input. -
D ZOOM (Digital zoom) +/- key
Zooms in or out on a part of the projected image. -
POSITION (Picture position) key
Not in use for the projector. - Infrared transmitter
-
ID MODE (ID mode) switch
Set an ID mode of the Remote Commander. If you assign a different ID number to each projector when multiple projectors are used, you can control only the projector with the same ID mode as that of the Remote Commander. -
CONTROL S output terminal
Connect to the CONTROL S input terminal on the projector with a connecting cable (stereo mini plug (not supplied)) to use the Remote Commander as a wired one.
You do not need to install batteries in the Remote Commander, as the power is supplied from the projector. -
ECO MODE (Eco mode) key
Allows you to set to Eco Mode.
Note
- When [Intelligent Setting] in the
 [Projection Setting] menu is set to [On], [Picture Mode] cannot be set.
Remote Commander Operation
- Direct the Remote Commander towards the remote control receiver on the projector.
- The shorter the distance between the Remote Commander and the projector, the wider the angle within which the Remote Commander can control the projector.
- If there is any obstruction between the Remote Commander and the remote control receiver on the projector, the projector may not be able to receive signals from the Remote Commander.