Setting SNMP
Change the SNMP control protocol settings from the [SNMP] page.
Note
- The entered value will not be applied until [Apply] is clicked.
-
Click the [SNMP] tab and display the [SNMP] page.
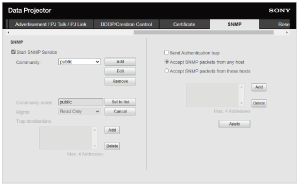
-
Configure each item and click [Apply].
Settings
[Start SNMP Service]
Turn SNMP on or off. The settings related to SNMP are applied only if it is on.
[Community]
Select the community name for SNMP.
- [Add]: Add a new community.
- [Edit]: Edit the community currently selected.
- [Remove]: Delete the community currently selected.
The default factory setting is “Public.” Select the Add button or the Edit button to add or edit the community.
- [Community name]: Enter the community name for SNMP.
- [Rights]: Set the access rights to the management information base (MIB).
- [Trap destinations]: Set the destination address for traps. Select the Add button to add the IP address to Trap destinations.
After editing, select the Set to list button to add these contents to the community list.
[Send Authentication trap]
Set to on to send a trap message when an authentication failure is detected.
[Accept SNMP packets from any host]
Set to on to allow receiving SNMP packets from any IP address.
[Accept SNMP packets from these hosts]
Set to on to restrict the reception of SNMP packets only from the hosts registered in the list.
[Host address list]
Select the Add button to add the IP address of the host that receives SNMP packets.
Hint
- Use the community name after changing the name used in the factory setting.
- Use a network environment with security measures in place.