Projecting on an Angled Wall
You can correct image twist with the corner wall feature to adjust the image distortion that occurs when projecting on a wall, floor, corner, pillar, etc.
-
Press the KEYSTONE key on the Remote Commander once.
The [Screen Fitting] menu will be displayed.
You can also display the menu from [Screen Fitting] in the
 [Installation] menu.
 -
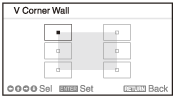
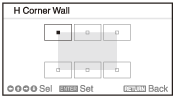
Select [V Corner Wall] or [H Corner Wall].
Select [V Corner Wall] when adjusting the horizontal distortion of the image, and select [H Corner Wall] when adjusting the vertical distortion of the image.
The guide will be displayed.
-
Select the adjustment point you want to correct with the
 /
/ /
/ /
/ (Up/Down/Left/Right) keys.
[V Corner Wall] has 6 adjustment points including the upper left, middle left, lower left, upper right, middle right, and lower right.
[H Corner Wall] has 6 adjustment points including the upper left, upper middle, upper right, lower left, lower middle, and lower right.
-
Press the ENTER key.
The selected corner becomes a cursor display (
 ).
). -
Adjust the image distortion with the/// (Up/Down/Left/Right) keys.
Adjust the position of the adjustment point using the
/// (Up/Down/Left/Right) keys.When correcting distortion on the left/right sides of the image
If the image is distorted to the shape shown in the figure, select [V Corner Wall] and adjust the positions of the adjustment points using the
/// (Up/Down/Left/Right) keys.
When correcting distortion on the top/bottom sides of the image
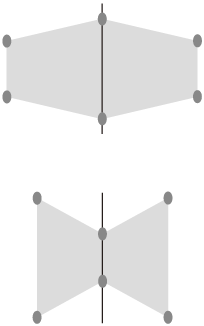
If the image is distorted to the shape shown in the figure, select [H Corner Wall] and adjust the positions of the adjustment points using the
/// (Up/Down/Left/Right) keys.
Press the RESET key to return to the original screen.
Note
- The setting may not be reset depending on the combination of adjustment values of [Screen Fitting] menu. In this case, reset all of the items from [Reset] in the [Screen Fitting] menu.