Projecting Images
The size of a projected image depends on the distance between the projector and screen. Place the projector so that the projected image fits the screen size. For details on projection distances and projected image sizes, see “Projection Distance.”
-
Turn on the projector.
Press the
 /
/ (On/Standby) key on the main unit or the (On) key on the Remote Commander.
 -
Turn on the connected device.
-
Select the input source.
Press the INPUT key on the projector or on the Remote Commander to display the input select window. Press the INPUT key repeatedly or the
 /
/ (Up/Down) key to select an image to be projected. The signal icon
 appears on the right side in the input select window when a signal is input. When there are multiple terminals to which signals are input, the terminals to which the signals are input are automatically selected each time the INPUT key is pressed.
You can select the input source using direct input select keys on the Remote Commander.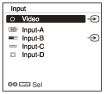
-
Change the computer screen output destination to an external display.
How to change the output destination varies, depending on the type of computer.
(Example)

-
Adjust the focus, size and position of the projected image.