Location and function of parts
-
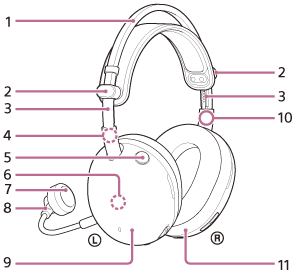
Headband
-
Slider knobs (left, right)
Slide to adjust the length of the headband.
-
Sliders (left, right)
-
 (left) mark
 -
Microphone on or off button
Switches the microphones on or off.
-
Built-in antenna
Proprietary 2.4 GHz and Bluetooth antennas are built into the headset.
-
Detachable Boom Microphone (with windscreen)
Attach to the left unit.
-
Microphone on or off indicator (red)
Lights up to indicate the microphone on or off status.
-
Left unit
-
 (right) mark
 -
Right unit
-
Serial number
Located inside the left unit.
-
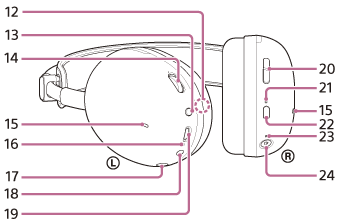
NC/AMB (noise canceling/Ambient Sound Mode) button
-
Volume dial –/+
Adjust the volume of the headset during wireless connection. There is a tactile dot on the + side.
-
Noise canceling function microphones (left, right)
Picks up the sound of the noise when the noise canceling function is in use.
-
Charging indicator (orange)
Lights up or flashes to indicate the rechargeable battery and charging status.
-
Boom microphone input jack
Connect the supplied boom microphone. Make sure that you insert the cable until it clicks. If the plug is not connected correctly, you cannot use the microphone.
-
Headphone cable input jack
Connect a music player or other device with the included headphone cable. Make sure that you insert the cable until it clicks. If the plug is not connected correctly, you may not hear the sound properly.
-
USB Type-C port
Charge the battery using one of the following methods with the supplied USB Type-C cable.
- Connect the headset to your computer
- Connect to an AC outlet using a commercially available USB AC adaptor
-
GAME/CHAT (GAME/CHAT BALANCE) button
There is a game button and a chat button. When connected to a computer, adjust the volume balance between game sound and voice chat.
-
Bluetooth indicator (blue)
Lights up or flashes to indicate the status of the Bluetooth connection.
-
Bluetooth button
 : Bluetooth mark
 -
Power indicator (white)
Lights up or flashes to indicate the power status and the connection status between the headset and the USB transceiver.
-
Power button
 : Power mark
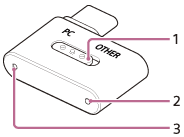
USB transceiver:
-
Slide switch
Switches the headset connection to a computer or other device.
-
Connection indicator (white)
-
Connect button
To check the serial number
- Make sure the headset is turned off and the USB Type-C cable is not connected.
- Remove the earpad from the left unit by pulling it straight off the housing. Avoid pulling it off at an angle.
The serial number and safety marks are located on the lower center of the left unit.
- Attach the removed earpad to the left unit.
Make sure that the direction of the two protrusions on the unit and the holes in the earpad are aligned, and firmly insert the six tabs into the unit until you hear a click.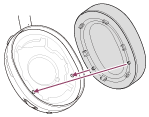
Note
- Do not remove the earpad unless necessary.
- Before removing the earpad, make sure the headset is turned off and the USB Type-C is not connected.
- Do not remove earpad in the presence of iron sand or other metal objects. Iron sand or other metal objects may adhere to the magnet inside the headset, causing the headset to malfunction.
- Be sure to attach the earpad in the correct direction. If the earpad is not attached in the correct direction, you may not get the desired acoustic performance.
- Any defects caused by failure to follow the above precautions are not covered by the product warranty.