Adding track marks automatically
You can set your IC recorder to add track marks automatically at specified intervals while normal recording is in progress.
-
Select [
 Settings] - [Recording Settings] - [Auto Track Marks] from the HOME menu, and then press
 (play/enter/stop).
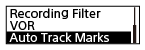
-
Press
 (review/fast backward) or
 (cue/fast forward) to select [Interval], and then press(play/enter/stop).
 -
Press(review/fast backward) or(cue/fast forward) to select the interval length and then press(play/enter/stop).
You can select [5 Min] (default setting), [10 Min], [15 Min], or [30 Min].
The Auto Track Marks function is turned on.
-
Press(review/fast backward) or(cue/fast forward) to select [Time Stamps], and then [Time Stamps On].
The time stamp will be added to the track marks when they are automatically added.
If you set [Auto Track Marks] before you make a long recording, such as a recording of an extended conversation, it will come in handy when you locate your desired track mark for playback because you can use the time stamps as references.
You can view all the track marks in a file by selecting [Track Mark List] on the OPTION menu.
-
Press and hold BACK/HOME to return to the HOME menu.
Hint
- To cancel the Auto Track Marks function setup process, select [OFF] in step 2.
- While the Auto Track Marks function is active, you can still add a track mark at any point by selecting [Add Track Mark] on the OPTION menu and pressing (play/enter/stop) during recording.
The contents of the Help Guide may be subject to change without notice due to updates to the product's specifications.