Viewing images on a TV using an HDMI cable
To view images stored on this product using a TV, an HDMI cable (sold separately) and an HD TV equipped with an HDMI jack are required.
- Turn off both this product and the TV.
- Connect the HDMI micro terminal of this product to the HDMI jack of the TV using an HDMI cable (sold separately).
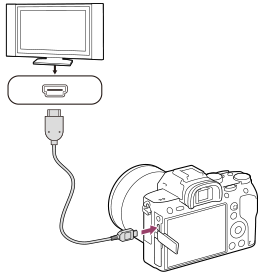
- Turn on the TV and switch the input.
- Turn on this product.
Images shot with the product appear on the TV screen.
- Select an image using the right/left sides of the control wheel.
- The monitor of this camera is not lit up on the playback screen.
- If the playback screen is not displayed, press the
 (Playback) button.
“BRAVIA” Sync
By connecting this product to a TV that supports “BRAVIA” Sync using an HDMI cable (sold separately), you can operate this product's playback functions with the TV remote control.
- After performing the steps above to connect this camera to a TV, select MENU →
 (Setup) → [HDMI Settings] → [CTRL FOR HDMI] → [On].
 - Press the SYNC MENU button on the TV remote control, and select the desired mode.
- If you connect this camera to a TV using an HDMI cable, available menu items are limited.
- Only TVs that support “BRAVIA” Sync can provide SYNC MENU operations. For details, refer to the operating instructions supplied with the TV.
- If the product performs unwanted operations in response to the TV remote control when the product is connected to another manufacturer’s TV using an HDMI connection, select MENU → (Setup) → [HDMI Settings] → [CTRL FOR HDMI] → [Off].
Hint
- This product is compatible with the PhotoTV HD standard. If you connect Sony PhotoTV HD-compatible devices using an HDMI cable (sold separately), the TV is set to the image quality suitable for viewing still images, and a whole new world of photos can be enjoyed in breathtaking high quality.
- You can connect this product to Sony PhotoTV HD-compatible devices with a USB terminal using the USB cable.
- The PhotoTV HD allows for a highly-detailed, photo-like expression of subtle textures and colors.
- For details, refer to the operating instructions supplied with the compatible TV.
Note
- Do not connect this product and another device using the output terminals of both. Doing so may cause a malfunction.
- Some devices may not work properly when connected to this product. For example, they may not output video or audio.
- Use an HDMI cable with the HDMI logo or a genuine Sony cable.
- Use an HDMI cable that is compatible with the HDMI micro terminal of the product and the HDMI jack of the TV.
-
When [
 TC Output] is set to [On], the image may not be output properly to the TV or recording device. In such cases, set [TC Output] to [Off].
-
If images do not appear on the TV screen properly, select MENU → (Setup) → [HDMI Settings] → [HDMI Resolution] → [2160p/1080p], [1080p] or [1080i] according to the TV to be connected.
- During HDMI output, when you switch the movie from 4K to HD image quality or vice-versa, or change the movie to a different frame rate or different color mode, the screen may become dark. This is not a malfunction.
-
If you set [File Format] to [XAVC S 4K] and shoot movies while the camera is connected to an HDMI device, images will not be displayed on the monitor.
-
When [NTSC/PAL Selector] is set to PAL, the screen may black out for an instant in the following situations. This is not a malfunction.
- When you start or stop recording movies while the shooting mode is set to a mode other than
 (Movie) or
  .
. - When you change the shooting mode from (Movie) or to another mode.
- When you play back a movie for the first time after switching to the playback mode.
- When you start or stop recording movies while the shooting mode is set to a mode other than