Launching the Cinema Pro app
- Find and tap
 (Cinema Pro icon).
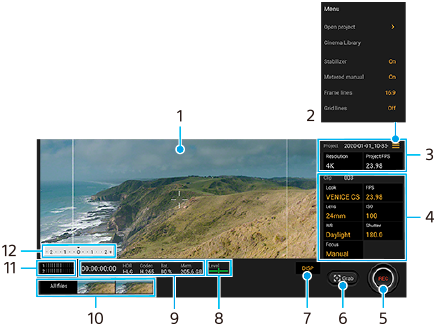
Cinema Pro home screen
Hint
-
Tap orange parameters to change settings.
-
Viewfinder
-
Menu icon – Tap to open the menu.
- Tap [Open project] to open an existing project or to create a new project.
- Tap [Cinema Library] to launch the Cinema Library app. You can open an existing project or watch a created film.
- Tap [Stabilizer] to switch the stabilizer function on or off.
- Tap [Metered manual] to show or hide the Metered Manual. The Metered Manual is displayed with a metering indicator on the viewfinder.
- Tap [Frame lines] repeatedly to display and select from various aspect ratios.
- Tap [Grid lines] to display and balance the composition.
- Tap [Level] to turn the level meter on or off.
- Tap [Level calibration] to calibrate the standard for the horizontal plane to fix deviations in the direction of tilt.
- Tap [Intelligent wind filter] to reduce wind noise.
- Tap [Assign camera key] to use the camera key as a REC button or a Grab button. When [Record] is selected, you can start recording by pressing the camera key even if a setting dialog is open.
- Tap [Assign volume keys] to use the volume key as a REC button or to activate the volume key for the Cinema Pro app. When [Record] is selected, you can start recording by pressing the volume key even if a setting dialog is open.
- Tap [Rec button pos.] to change the position of the REC button and the Grab button.
-
Project settings
Tap an orange parameter to adjust the resolution and frame rate of the entire project or video clips. The project settings can only be changed before recording the first video clip.
-
Clip settings – Parameters to adjust for each video clip.
- Tap [Look] to adjust the ambience of the video clip.
- Tap [FPS] to adjust the frame rate. Select [120fps] to record a video in slow motion.
- Tap [Lens] to select a lens.
- Tap [ISO] to adjust the ISO value. Tap [Auto] when it is orange to adjust to the appropriate ISO value automatically.
- Tap [WB] to adjust the white balance. You can use the sliders to adjust the white balance.
Tap [Reset] to reset the slider values for the selected setting.
To adjust the white balance according to a selected white area, select [Custom], tap [Set], hold your device so that the white area fully covers the frame in the center, and then tap [Set] again.
If you select [Auto], you can set whether to lock the white balance settings. - Tap [Shutter] to adjust the shutter speed. Tap [Auto] when it is orange to adjust the appropriate shutter speed automatically.
- Tap [Focus] to adjust the focus. Tap [AF] or [MF] to switch the focus mode to auto or manual. When the focus mode is set to manual, you can adjust the focus markers and speed of focus pulling by tapping
 (Settings icon). When the focus mode is set to auto, you can specify the focus area by tapping the viewfinder.
-
Tap to start or stop recording.
-
Tap to capture the current frame as a still image.
-
Tap to hide or show the frame lines, grid lines, and the Metered Manual.
-
Level meter
Level meter helps you to measure the angle of the device and keep the picture horizontal. When your device senses that it is level, the level meter turns green.
-
Status indications
-
- Tap a thumbnail to view a video clip or still image. Swipe left or right to view the previous or next video clip or still image.
- Tap [All files] to view a video clip or still image that is not in the thumbnail view. While viewing a video clip or still image, swipe left or right to view the previous or next one.
- You can capture a still image from the video by tapping
 (Edit video icon) while playing. Tap
  (Back button) to return to the Cinema Pro home screen.
-
Tap to change the audio level.
-
Metered manual
The Metered Manual indicates underexposure/overexposure.