Launching Photo Pro (Photography Pro)
- Find and tap
 (Photo Pro icon).
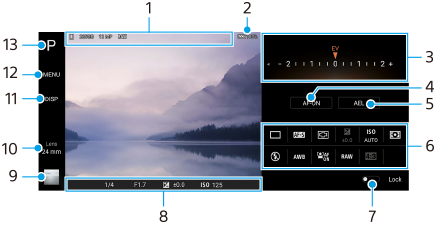
Photo Pro standby screen
-
Data storage icon/Amount of free space/Aspect ratio/File format
The scene icon or condition icon is also displayed when the AUTO mode is selected.
-
Battery status
-
Dial
- Adjust the exposure value when the P mode is selected.
- Adjust the shutter speed when the S mode or M mode is selected.
-
Tap to lock the focus.
The button turns orange when the focus is locked. Tap the button again to unlock the focus.
-
Tap to lock the exposure.
The button turns orange when the exposure is locked. Tap the button again to unlock the exposure.
-
Setting icons
Tap to adjust settings.
 (Drive mode)/
 (Focus mode)/
 (Focus area)/
 (Exposure)/ISO (ISO)/
 (Metering mode)/
 (Flash mode)/AWB (White balance)/
 (Face/Eye AF)/RAW (File format)/
 (Aspect ratio)
The settings depend on the mode or lens selected.
-
Tap to lock the items on the left side of the viewfinder and the setting icons, and prevent accidental operations.
-
Focus indicator/exposure settings
 (Auto focus icon) indicates that the subject is in focus.
 (AE lock icon) indicates that the exposure is locked.
 -
Tap the thumbnail to view, share, or edit photos.
Tap
 (Back button) to return to the Photo Pro standby screen.
 -
Tap to switch lenses.
To use the zoom, tap
 (Open zoom dial icon), pinch in or out on the viewfinder, or use the volume key.
 -
Tap to show or hide information displayed on the viewfinder.
-
Tap to adjust more detailed settings.
-
Tap to switch the shooting mode.