Recording with the built-in microphones
The following describes the basic recording steps with the selected sensitivity level of the built-in microphones and recording mode.
Note
-
Before you start recording, make sure that your IC recorder and the remote control are released from the HOLD state.
-
You can operate either your IC recorder or the remote control to start recording. After you started recording, check the operation indicator on the IC recorder to make sure that recording is in progress. On the remote control, you cannot check the power state of the IC recorder. Before you operate the remote control to start recording, make sure that the IC recorder and the remote control are turned on.
-
If you accidentally touch your IC recorder or let an object come in contact with it while recording is in progress, rustling or scratching noises may be recorded.
Hint
-
Before you start recording, we recommend you first make a trial recording or monitor the recording. For instructions on monitoring the recording, see Monitoring the recording audio.
-
Recorded files are stored in “FOLDER01” under “
 Recorded Files” by default. To change the storage folder for recorded files, see Changing the storage folder for recorded files.
- Turn your IC recorder so that its built-in microphones (
 ) point in the direction of the target sound source.
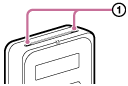
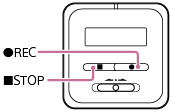
- Press
 REC.
REC.“REC” appears on the display window of the IC recorder to indicate that recording is in progress, and the operation indicator (
 ) lights in red.
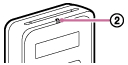
- Press
 STOP to stop recording.
 The “Saving...” message and then the recording stops.
Note
-
While the “Saving...” message is on the display window, your IC recorder is saving the file to the built-in memory.
Hint
-
To change the storage folder for recorded files, use the OPTION menu to display the Recording Folder screen while recording is on standby. Then, select another folder.
-
To make settings that are suitable for a particular recording scene, select “Scene Select” from the OPTION menu while recording is on standby.
-
To play the file that you just recorded, press
 on the remote control while recording is on standby.
 -
You can still press
REC to start recording while playback is in progress or a menu is on the display window. -
It is recommended that you monitor the ongoing recording. Connect the supplied stereo headphones to your IC recorder with the dedicated headphone cable that is also supplied with the IC recorder.
-
Recorded files are named as “(recording date)_(recording time).(file format)” (e.g. 171010_0706.mp3).
-
If the file size reaches the maximum limit (4 GB for an LPCM file, and 1 GB for an MP3 file) during recording, the file will be divided and some of the recording may be lost around the divided point.