Cleaning the image sensor (Sensor Cleaning)
If dust or debris gets inside the camera and adheres to the surface of the image sensor (the part that converts the light to an electric signal), it may appear as dark spots on the image, depending on the shooting environment. If this happens, clean the image sensor quickly by following the steps below.
- Confirm that the battery has been charged sufficiently.
- MENU →
 (Setup) → [Setup Option] → [Sensor Cleaning] → [Enter].
The image sensor vibrates a little to shake off the dust.
 - Turn off the camera following the instructions on the screen.
- Detach the lens.
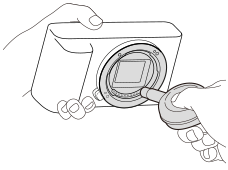
- Use a commercially available blower to clean the image sensor surface and the surrounding area.
- Hold the camera slightly face downward so that the dust falls out.

- Hold the camera slightly face downward so that the dust falls out.
- Attach the lens.
Hint
- For how to check the amount of dust on the image sensor, and for further details on cleaning methods, please refer to the following URL.
https://support.d-imaging.sony.co.jp/www/support/ilc/sensor/index.php
Note
- Make sure that the remaining battery level is 51% or more before performing cleaning.
- Do not use a spray type blower as it may scatter water droplets inside the camera body.
- Do not put the tip of a blower into the cavity beyond the lens mount area, so that the tip of the blower does not touch the image sensor.
- When cleaning the image sensor with a blower, do not blow too hard. If you blow the sensor too hard, the inside of the product may be damaged.
- If the dust remains even after you cleaned the product as described, consult the service facility.
- During cleaning, the image sensor emits a vibrating noise. This is not a malfunction.
- Cleaning may be performed automatically when the power is turned off.
TP1001224910

