Time-lapse Settings

You can record movies by condensing changes over a period of time of up to several dozen minutes. Unlike quick-motion movie recording, you can set a shooting interval longer than 1 second. This enables you to record movies with a larger time compression ratio. Sound will not be recorded. When creating longer time-lapse movies, use the “ Interval Shoot Func. .”
Configure settings such as the recording frame rate and shooting interval in [ Time-lapse Settings].
When shooting a time-lapse movie, set the Still/Movie/S&Q switch to S&Q, and select the shooting mode for time-lapse shooting from MENU →  (Shooting) → [Shooting Mode] → [
 Shoot Mode].
-
MENU →
 (Shooting) → [Image Quality/Rec] → [
 Time-lapse Settings] → Select an item to set, and then select the desired setting.
Menu item details
-
 Frame Rate Settings:
 -
Sets the recording frame rate and shooting interval.
 Rec Frame Rate: Sets the recording frame rate for a time-lapse movie. (60p/50p/30p*/25p*/24p)
* [30p]/[25p] cannot be selected when [
 File Format] is set to [XAVC HS 4K].
 Interval Time: Sets the shooting interval for a time-lapse movie. (1 to 60 seconds)
- For the first 10 seconds, the interval can be set in units of 1 second. For the 10th to 60th second, the interval can be set in units of 10 seconds.
- When the file format is set to 4K, you cannot select a value of 6 seconds or longer.
- The interval time is the interval from the start of exposure to the start of the next exposure, regardless of shutter speed.
-
 Record Setting:
 -
Selects the bit rate, color sampling, and bit depth of the movie.
-
 Video Light Setting:
 - When a video light (sold separately) is attached, you can turn the video light on before each frame for the time-lapse movie is recorded. Sets how many seconds before the light turns on. (Off/2 Sec/5 Sec/10 Sec)
About the recordable time
Approximate times for continuous shooting in the time-lapse shooting mode are as follows. (When [Auto Power OFF Temp.] is set to [High] and the ambient temperature is 25°C (77°F))
When [ File Format] is set to HD:approx. 60 minutes
When [
 File Format] is set to 4K:approx. 30 minutes
HD: XAVC S HD (60p 50M/50p 50M 4:2:0 8bit, when the camera is not connected via Wi-Fi; when the monitor is open)
4K: XAVC S 4K (60p 150M/50p 150M 4:2:0 8bit, when the camera is not connected via Wi-Fi; when the monitor is open)
Using a video light
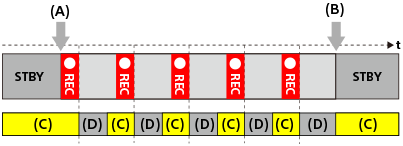
When a video light is attached in the time-lapse shooting mode, the video light will turn on before recording starts in order to control the light correctly from the first frame.
After recording starts, the video light will turn on/off repeatedly in conjunction with shooting/standby for each frame.

(A) Start of recording
(B) End of recording
(C) Video light on (At the start of recording, the video light turns on earlier than the number of seconds set in [ Video Light Setting])
(D) Video light off (The video light remains dimly lit when [Video Light Mode] is set to [REC Link&STBY])
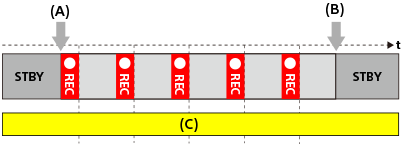
In the following cases, however, the video light will remain lit even during shooting standby:
- When [
 Video Light Setting] is set to [Off].
 - When the time from the end of the frame shooting to the start of the next lighting is 5 seconds or less according to the settings for [
 Interval Time] and [
 Video Light Setting].

(A) Start of recording
(B) End of recording
(C) Video light on
Hint
- When [Video Light Mode] is set to [Power Link], the video light turns on/off in conjunction with the power, regardless of the [
 Video Light Setting] setting.
 - To enable interval operation with [
 Video Light Setting], set [Video Light Mode] to [REC Link] or [REC Link&STBY].
 - When you shoot a long time-lapse movie, it is recommended that you use an external power supply for the camera.
- When [Auto Power OFF Temp.] is set to [High], the camera can continue movie recording even when the temperature of the camera becomes high.
- At the end of the time-lapse movie, a normal-speed movie may be recorded for about 1 second.

