Function menu
![]()
-
Drive mode
Single shooting
Continuous shooting: Hi: Shoots images continuously while you press and hold down the camera key. The speed reaches a maximum of 20 images per second.
Continuous shooting: Lo: Shoots images continuously while you press and hold down the camera key. The speed reaches a maximum of 10 images per second.
Self-timer: 3 sec / Self-timer: 10 sec
-
Focus mode
Single-shot AF: When you press the camera key halfway down and the camera focuses on a subject, the focus remains locked until you stop pressing the camera key halfway down. Use [Single-shot AF] when the subject is motionless.
Continuous AF: The camera continues to focus while the camera key is pressed and held halfway down. Use [Continuous AF] when the subject is in motion.
Manual Focus: Adjusts the focus manually using the slider that is displayed below the function menu. If you cannot focus on the intended subject using auto focus, use manual focus.
-
Focus area
Wide: Automatically focuses on the whole range of the screen.
Center: Automatically focuses on a subject in the center of the image.
-
Exposure value
Adjusts the exposure value in the Shutter speed priority (S) mode and Manual exposure (M) mode using the dial.
-
ISO sensitivity
Sets the ISO sensitivity automatically (AUTO) or manually. Sensitivity to light is expressed by the ISO number (recommended exposure index) using the dial. The larger the number, the higher the sensitivity.
-
Metering mode
Multi: Measures light on each area after dividing the total area into multiple areas and determines the proper exposure of the entire screen (Multi-pattern metering).
Center: Measures the average brightness of the entire screen, while emphasizing the central area of the screen (Center-weighted metering).
Spot: Measures only inside the metering circle.
-
Flash mode
Auto / Fill flash / Red-eye reduction / Off / Flashlight
-
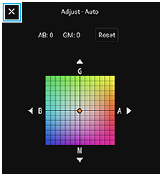
White balance
Auto / Cloudy / Daylight / Fluorescent / Incandescent / Shade: Adjusts the color tones according to the selected light source that is illuminating the subject (preset white balance). To finely adjust the color tones, tap [Adjust] to display the fine adjustment screen, and then move the orange dot to the desired position. After adjusting, tap
 (Close button).
Custom 1 / Custom 2 / Custom 3: Memorizes the basic white color under the light conditions for the shooting environment. To adjust the basic white color, select one of the items, tap [Set], and then follow the on-screen instructions.
-
Face/Eye AF
On / Off
The camera detects the faces or eyes of people and animals and focuses on them automatically.
-
File format
RAW: Digital processing is not performed on this file format. Select this format to process images on a computer for professional purposes.
RAW & JPEG: A RAW image and a JPEG image are created at the same time. This is suitable when you need two image files, a JPEG for viewing, and a RAW for editing.
JPEG: The image is recorded in the JPEG format.
-
Aspect ratio (Image size)
The image size is displayed according to the aspect ratio.
4:3 / 16:9 / 1:1 / 3:2
-
D-Range Optimizer (DRO) / Auto HDR
D-Range Optimizer: Optimizes brightness and gradation by analyzing the contrast between the subject and the background from a single image.
Auto HDR: Optimizes brightness and gradation by overlaying multiple images shot using different exposures.
To re-assign or re-order setting items in the function menu
- Tap [MENU] > [Setup] > [Function menu customization].
- Follow the on-screen instructions.