Overview
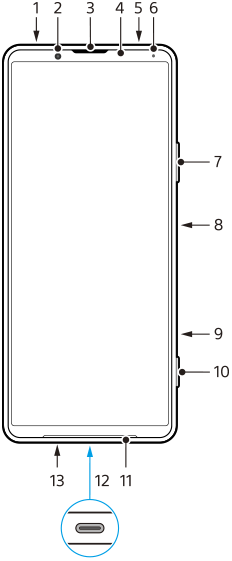
- Headset jack
- Front camera
- Ear speaker/Second loudspeaker
- Proximity/Light sensor
- Second microphone
- Charging/Notification light
- Volume/Zoom key
- Power key/Fingerprint sensor
- Shortcut key
You can quickly launch an assigned app. Video Pro is assigned by default.
- Camera key
- Main loudspeaker
- USB port/Charger
You can view the screen of your device on a TV or other large display device using a USB Type-C® cable.
You can also access the internet via a LAN cable by using a commercially available USB-LAN adapter.
Note
- When you connect your device to a TV or other large display using a USB Type-C cable, the cable must be compatible with the display port standard. Note that some functions or content on your Xperia device may not be displayable on the TV or display device.
- Some USB-LAN adapters may not work properly.
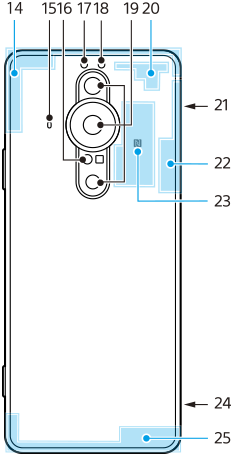
- Main microphone
- Cellular antenna
- 3rd microphone
To use the 3rd microphone, select [Rear mic (mono)] (for Photo Pro), [Rear (mono)] (for Video Pro), or [Rear] (for Cinema Pro) in the microphone settings. When the 3rd microphone is selected, touch the rear panel as little as possible during recording to avoid noise being recorded.
- Laser AF sensor
- Flash LED
- RGBC IR sensor
- Main camera
- Cellular/Wi-Fi antenna
- Nano SIM/Memory card slot
- Wi-Fi/Bluetooth/GPS antenna
- NFC detection area
- Strap hole
- Cellular antenna