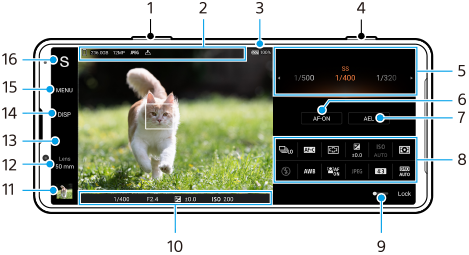
AUTO/P/S/M mode overview
-
Use the volume key to zoom in or out.
-
Data storage icon/Amount of free space/Image size/File format/Geotagging status
The scene icon or condition icon is also displayed when the AUTO mode is selected.
-
Battery status
-
Use the camera key to launch Photo Pro or shoot images.
-
Dial
- Adjust the exposure value when the Program auto (P) mode is selected.
- Adjust the shutter speed when the Shutter speed priority (S) mode or Manual exposure (M) mode is selected.
-
Tap to lock the focus.
The button turns orange when the focus is locked. Tap the button again to unlock the focus.
-
Tap to lock the exposure.
The button turns orange when the exposure is locked. Tap the button again to unlock the exposure.
To assign another function to the AEL button, tap [MENU] > [Setup] > [AEL button customization].
-
Function menu
Tap to adjust settings.
To re-assign or re-order the setting items in the function menu, tap [MENU] > [Setup] > [Function menu customization].
-
Drag the switch to the right to lock the items on the left side of the viewfinder and the function menu, preventing accidental operations.
-
Focus indicator/exposure settings
 (Auto focus icon) indicates that the subject is in focus.
 (AE lock icon) indicates that the exposure is locked.
 -
Tap the thumbnail to view, share, or edit photos.
Tap
 (Back button) to return to the Photo Pro standby screen.
 -
Tap to switch lenses.
To use the zoom, tap
 (Open zoom dial icon), pinch in or out on the viewfinder, or use the volume key.
[50 mm] will be made available through a software update. Software rollouts are a phased process; the timing and availability vary by market and/or operator.
- Tap to change the aperture value when [Lens] is set to [24 mm].
-
Tap to show or hide information displayed on the viewfinder.
The histogram represents the luminance distribution graphically.
The level meter helps you to measure the angle of the device and keep the picture horizontal. When your device senses that it is level, the level meter turns green.
To customize the items that are displayed when you tap [DISP], tap [MENU] > [Setup] > [DISP button customization].
-
Tap to adjust more detailed settings.
-
Tap to switch the shooting mode.
To select the default shooting mode when Photo Pro is launched, tap [MENU] > [Setup] > [Shooting mode at launch], and then select an option.