Using the menu
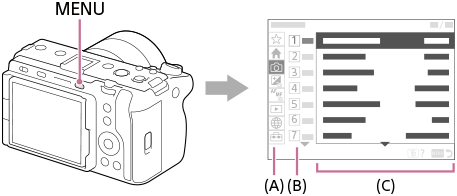
The menu screen is displayed by pressing the MENU button. You can change settings related to all of the camera operations including shooting and playback, or you can execute a function from the menu screen.

(A) Menu tab
Menu tabs are categorized by usage scenario, such as shooting, playback, network settings, etc.
(B) Menu group
In each tab, menu items are grouped by function.
The number assigned to the group is the serial number in the tab. Refer to the number to determine the location of the group in use.
(C) Menu item
Select the function you want to set or execute.
Hint
- The name of the selected tab or group is displayed at the top of the screen.
- When [Touch Operation] is set to [On], touch operations on the menu screen are possible.
Basic operations on the menu screen
- Press the MENU button to display the menu screen.
- Move within the menu tree and find the desired menu item by pressing the top/bottom/left/right side of the control wheel.
- The displayed menu items differ between the still image shooting modes and movie recording modes.

(A) Menu tabs
(B) Menu groups
(C) Menu items
- The displayed menu items differ between the still image shooting modes and movie recording modes.
- Press the center of the control wheel to select the menu item.
The setting screen or execution screen for the selected item will appear on the monitor.
- Select a parameter or execute the function.
- If you want to cancel changing the parameter, press the MENU button and go back to the previous screen.
- Press the MENU button to exit the menu screen.
You will return to the shooting screen or playback screen.
Hint
-
In the
 (Main) tab, you can view a list of the current shooting settings. Select a setting value in the tab to open the corresponding menu item and change the setting value.
- You can display the menu screen by assigning the [MENU] function to a custom key using [
 Custom Key/Dial Set.] or [
 Custom Key/Dial Set.], and then pressing that key.
Relationship between the shooting mode and menu screen
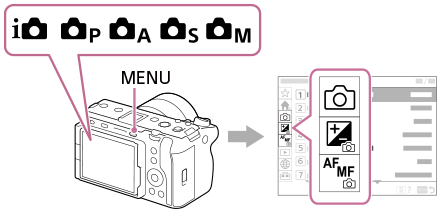
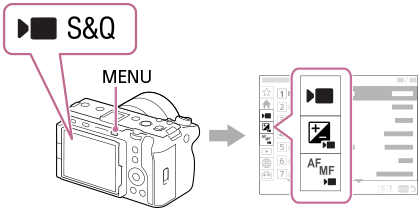
The menu groups and menu items displayed in the [Main], [Shooting], [Exposure/Color], and [Focus] tabs vary depending on the shooting mode.
Still image shooting modes (AUTO/P/A/S/M)
- Menu items for shooting still images are displayed.*

* Since you can record movies with the REC (recording) button even in the still image shooting mode, some basic movie menu items are also displayed.
Movie recording modes (
 /S&Q)
/S&Q)
- Menu items for recording movies are displayed.

Latest software notification badge

If newer camera software is available, a red notification badge will appear over the  (Setup) tab, [Setup Option], and [Version] in the menu screen to notify you that an update is available (when the camera’s system software (firmware) is Ver.6.00 or later).
Icons used in the “Help Guide”
 : Menu items displayed in the still image shooting modes (AUTO/P/A/S/M)
 : Menu items displayed in the movie recording modes (Movie/S&Q)
 : Menu items displayed in both the still image shooting modes and movie recording modes

