Maintenance
Perform regular maintenance by following the procedures below.
-
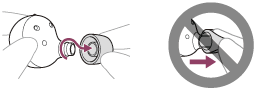
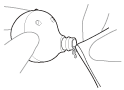
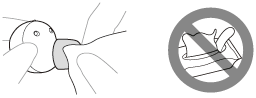
Remove the earbud tip.
Hold the headset unit and twist the earbud tip while rotating it to pull it out.
Do not pinch the end of the earbud tip when removing it.
-
Clean the headset.
Cleaning the headset units
When the headset exterior is dirty, wipe it clean with a soft dry cloth. If the headset is particularly dirty, soak a cloth in diluted neutral detergent, and wring it well before using it to clean the headset. Do not use solvents such as alcohol, thinner, or benzene, as they may damage the finish on the surface of the headset or cause other damages.
Use a soft dry cloth to wipe off any water that gets on the headset units.
Do not allow the headset to remain with water droplets attached in a cold environment as the water may freeze.
Cleaning the microphone parts
Wipe off any dirt on the mesh part of the headset unit with a cloth that has been moistened with water and wrung out tightly.
Remove the dirt so that it does not push into the mesh part of the headset unit deeply.
Cleaning the IR sensors
If the IR sensors are dirty, wearing of the headset may not be detected and the headset may not work properly.
Wipe off any dirt on the IR sensors with a soft dry cloth, etc.
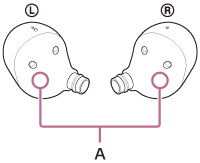
A: IR sensors (left, right)
Cleaning the charging ports
If foreign matter or moisture, such as sweat, etc., is left on the charging ports of the headset units or charging case, charging port corrosion may occur and prevent charging.
When you have finished using the headset, make sure to gently clean the charging ports with a soft dry cloth or cotton swab.
When the headset cannot be charged, it may help to try thoroughly cleaning the charging ports.
Charging ports that needs maintenance
-
Headset
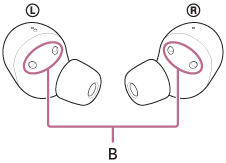
B: Charging ports of the headset units (left, right)
-
Charging case
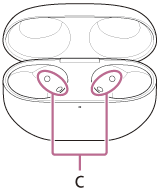
C: Charging ports of the charging case (left, right)
Note
- Do not use an air duster, etc. to remove dust, etc.
Dust, etc. may enter the sound output hole and lead to malfunction.
Cleaning of the sound output holes
Wipe off any dirt such as earwax in the sound output hole of the headset unit with a cloth that has been moistened with water and wrung out tightly.
Remove the dirt so that it does not push into the headset unit deeply.
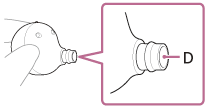
D: Sound output hole
Cleaning the holes of the charging case
Clean the holes where the earbud tips fit with a cotton swab, etc.

E: Holes of the charging case (left, right)
Drying the headset
After cleaning is complete, leave the headset to dry thoroughly in room temperature.
Note
- When drying the headset, if the IR sensors touch the table, the headset will be considered worn and the rechargeable battery may continue to be consumed. Place the headset units with the IR sensors facing sideways or upwards.
Cleaning the noise isolation earbud tips
When the noise isolation earbud tips become dirty, wipe off the dirt with a dry cloth, etc.
If foreign material such as earwax becomes attached to the mesh part of the earbud tip, the sound may become muffled or difficult to hear.
Remove the earbud tip from the headset, apply a cotton swab lightly to the mesh part, and rotate the cotton swab slowly to wipe off the dirt. Be careful not to tear the mesh part.

Note
- Earbud tips are consumables.
- When the earbud tips get soaked, drain the liquid well, and make sure that the earbud tips are dried before use or storage.
- Avoid washing with water, wet wipes, and the use of organic solvents such as alcohol, as these can cause premature deterioration.
- Rubbing with paper, using sharp metal objects, nails, adhesive tape, etc., may damage or deform the earbud tips.
- Do not pull on the polyurethane foam portion of the earbud tip. If it is separated from the earbud tip, it will not function.
- Do not subject the polyurethane foam portion of the earbud tip to pressure for over long periods of time. It may cause deformation and it may be difficult to return the earbud tip to the original shape.
- The foam materials may become firm at a low temperature. Warm the earbud tips a little with your hands before use.
- When the environmental temperature or usage temperature is high, the polyurethane foam may take time to return to its original shape.
-
-
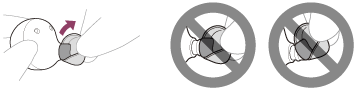
Attach the earbud tip.
Push the earbud tip firmly onto the sound conduit (sound output tube) on the headset so that the earbud tip covers the inner end of the sound conduit. Do not attach the earbud tip in a loose or skewed manner.

If the earbud tip is not completely attached, the earbud tip may be removed from the headset and the sound quality, noise canceling effects, and wearability may be impaired.
-
Check that the earbud tip is securely attached.
Twist the earbud tip to one side and check that the stem of the earbud tip is completely covering the sound conduit on the headset unit.
-
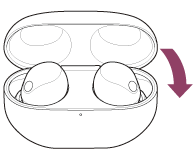
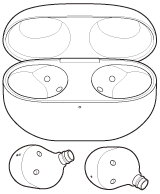
Set the headset in the charging case.
After maintenance as well as after cleaning and drying the headset, be sure to set the headset units in the charging case.
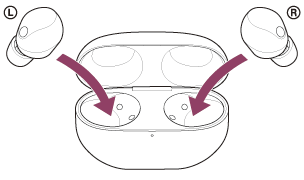
Be sure to close the charging case lid.