Connecting to a Wi-Fi network using a PC connected wirelessly
Note that the speaker should be initialized to the factory default for this connection. All BLUETOOTH device registration (pairing) information is deleted. To use the BLUETOOTH connection after that, delete all pairing information on the PC, and then set pairing again.
This section describes how to connect a PC and the speaker wirelessly, then how to connect the speaker to a wireless router, using the PC.
Do the following before starting.
- Place the speaker closer to the wireless router.
- Locate the SSID (the name of a wireless network) and encryption key (WEP or WPA), which are required to set up a Wi-Fi network. The encryption key restricts access to devices on a network. It is used to make more secure communication between the devices connected to wireless routers or access points.
- Have the Wi-Fi network name (SSID) and password (encryption key) of the wireless router available for reference.For details, refer to the operating instructions supplied with your wireless router.
- With the speaker turned on, press and hold the – (volume) button and the
 (power)/
 PAIRING button at the same time for more than 4 seconds to initialize the settings of the speaker.
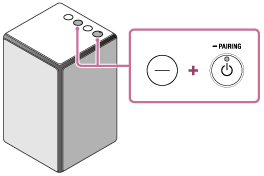
The
(power) indicator flashes quickly in green for two seconds. The settings of the speaker return to their factory defaults, and network information and all BLUETOOTH device registration (pairing) information are deleted. Then, the speaker enters the start-up mode automatically. It takes about 60 to 80 seconds to turn on the speaker. When the (power) indicator turns off (standby mode), you can turn on the speaker. - Turn on the speaker.
- Connect the speaker to the PC.
Modern UI:
-
Move the mouse pointer to the top-right (or bottom-right) corner of the Start screen to display the charms, then select [Settings]. In the case of a touch panel, display the charms by swiping from the right side of the screen to the center, then select [Settings].

- Select
 or
or  .
. - Select [SRS-ZR5] from the network list.
Windows 7/Windows 8.1:
- For Windows 8.1, click or tap the desktop on the Start screen.
-
Select
or on the right-bottom of the screen.
- Select [SRS-ZR5] from the network list.
Windows 10:
-
Select
 on the right-bottom of the screen.
- Select [SRS-ZR5] – [Connect] from the network list.
Mac:
- Click
 at the top of the screen.
 - Select [Open Network Preferences...].
- Select [SRS-ZR5] from the network list.
-
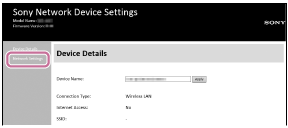
- Display the [Sony Network Device Settings] screen.
- Launch a browser (Internet Explorer, Safari, etc.).
- Enter the following URL in the address bar.
- Select [Network Settings] from the menu.
- Enter the SSID of the wireless router and the password.
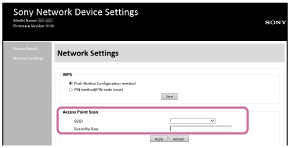
- Select [Apply].
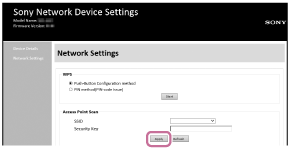
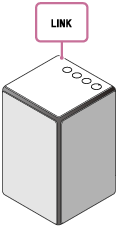
- Check that the LINK indicator lights up in orange.
When the Wi-Fi connection is completed, the LINK indicator lights up in orange. It may take more than a minute for the LINK indicator to light up.
The connection is complete.
- Connect the PC to the wireless router to be used.

Hint
- If you want to set a fixed IP address, set in the screen in step
 above.
 - When the connection of the speaker to your Wi-Fi network has completed, connect your PC to the previous destination or your wireless router.
Note
- This procedure needs to be completed within 30 minutes. If you cannot complete within 30 minutes, start over from step
 .
. - Until you finish the Wi-Fi network setting, it will not be protected. The Wi-Fi network will be protected again after setting the Wi-Fi security.
- When you connect the speaker to a Wi-Fi network for the first time after purchase, the BLUETOOTH/Network standby mode is turned on automatically.