


Preview screen operations
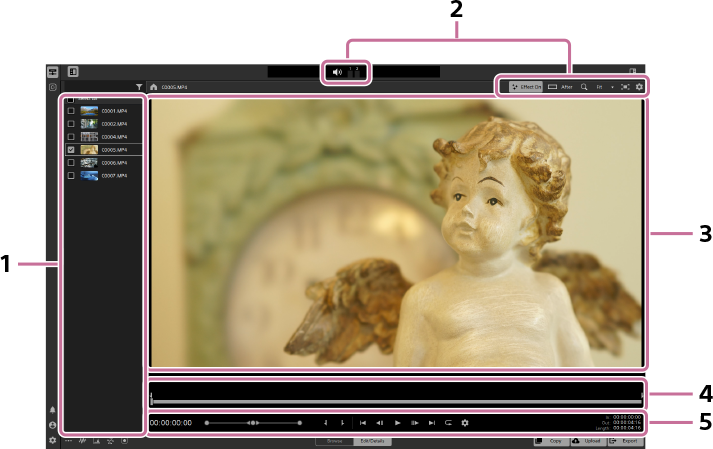
| Number | Classification | Button | Description |
|---|---|---|---|
| 1 | Clip list | ― | The list shows the clips in the folder that contains the currently selected clip. |
| 2 | Preview settings |

|
Click this button to adjust the volume level of the clip. You can also select the audio channels to play. Refer to the following section for details. Master volume |
|
Click this button to toggle the preview between before and after adjustments. Refer to the following section for details. About applying correction effects |
||

|
Click this button to select the preview options during adjustments, such as the split view or 2-up view. Refer to the following section for details. Switching the preview display |
||

|
Click this button to set the preview magnification during adjustments. | ||

|
Click this button to switch the preview to the full-screen view. | ||

|
Click this button to set the display direction, aspect ratio, and display range of clips. | ||
| 3 | Preview area | ― | The clip preview will be displayed. |
| 4 | Trackbar | ― | The preview position and mark points, etc. are displayed on the timeline. |
| 5 | Transport controls | ― | Use these controls to perform playback operations on the clip. |
Switching the preview display
Repeatedly clicking the preview display switch button at the top of the preview allows you to select options for displaying the preview before and after adjustments.
: Preview display switch button
- The display options are as follows.
| Option | Description |
|---|---|

|
After: Select this option to display the preview after applying color and clip adjustments. |

|
Split: Select this option to display a preview that is vertically split before and after applying color adjustments and clip adjustments. The left side displays the preview before adjustments, and the right side displays the preview after adjustments. You can adjust the split position by dragging the handles at the top and bottom of the preview. |

|
2 Up: Select this option to display the previews before and after color and clip adjustments side by side. The left side displays the preview before adjustments, and the right side displays the preview after adjustments. |

|
Before: Select this option to display the preview before applying color and clip adjustments. |
Clip settings/Overlay settings
Clicking the [Clip settings] button at the top of the preview allows you to set the display direction and rotation direction of clips.
: [Clip settings] button
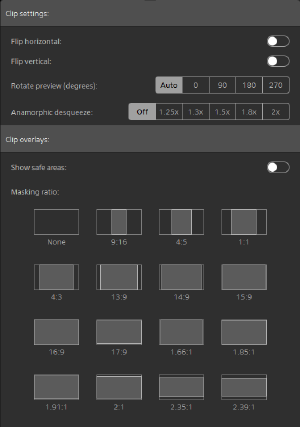
- The setting options are as follows.
| Option | Description |
|---|---|
| Flip horizontal | Select this option to flip the clip horizontally. |
| Flip vertical | Select this option to flip the clip vertically. |
| Rotate preview (degrees) | Select this option to set the rotation angle in 90-degree increments. |
| Anamorphic desqueeze | Select this option to set the correction ratio for clips shot with an anamorphic lens. |
| Show safe areas | Select this option to display 90% (Action safe area), 80% (Title safe area), and the center point of the frame. |
| Masking ratio | Select an aspect ratio to apply masking. |
Trackbar
Clip playback events, etc. are displayed on the timeline.

- Mark-in point: You can drag the mark-in point to move the playback start position.
- Current playback position
- Mark point location
- Mark-out point: You can drag the mark-out point to move the playback end position.
Transport controls
Use these controls to perform playback operations on the clip.

- The timecode will be displayed.
- Drag the shuttle control to quickly move to the editing point you want to edit.
- Click the button to set the mark-in point or mark-out point at the current playback position.
- Click the button to return the playback position to the mark-in point. Clicking the button again returns to the beginning of the selected clip.
- Click the button to move the playback position one frame or one field to the left.
- Click the button to start playback. When you select multiple clips, only the first clip will play.
- Click the button to move the playback position one frame or one field to the right.
- Click the button to move the playback position to the mark-out point. Clicking the button again moves to the end of the selected clip.
- Click the button to set loop playback between the mark-in and mark-out points.
- The [PLAYBACK SETTINGS] dialog will appear, and you can configure the following settings.
- Priority for decoding speed and quality
- Priority for real-time playback and frame rate
- You can quickly set mark-in and mark-out points by clicking and directly entering timecode. This feature is not available for MXF proxy clips with embedded timecode.
Master volume
Click the following button at the top of the screen to display the control panel.
: [MASTER VOLUME] button
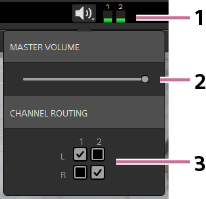
- Volume meter: You can visually monitor the volume level during preview.
- Volume slider: You can adjust the volume level.
- CHANNEL ROUTING: Select the audio channels to play. In this example, the first channel will play from the left speaker, and the second channel will play from the right speaker.
Note
- This software only supports stereo output devices.
About applying correction effects
The following [Effect On] button will be displayed for clips for which you have configured correction settings.
In the preview mode:
In the thumbnail/list view: 
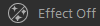
Each time you click the button, the preview toggles between before and after applying the correction.
Note
- Be sure to set the button to [Effect On] if you want to export a clip with corrections applied.
If you export the clip when the button is set to [Effect Off] as follows, the correction will not be applied to the exported clip.
In the preview mode:
In the thumbnail/list view:
