


Transcoding clips
You can convert a clip to a different video format and export it as a new clip while keeping the original one.
You can also export clips with video correction and color adjustments applied without changing the video format.
This operation can be performed from any of the following screens:
- [Browse] screen
- [Edit/Details] screen
- Select a clip to transcode.
- You can also select multiple clips and transcode them all at once.
-
Click the following button in the lower right of the screen.
 : [Export] button
The [Export] dialog will open.
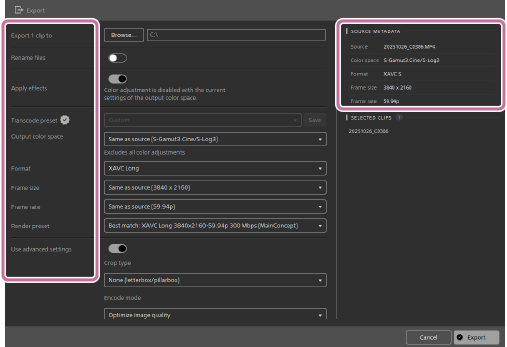
- In the [SOURCE METADATA] section on the right side of the dialog, you can view the following metadata for the selected clip
Source/Color space/Format/Frame Size/Frame Rate
- In the [SOURCE METADATA] section on the right side of the dialog, you can view the following metadata for the selected clip
- Configure the transcoding settings.
- Refer to the following section for details on the settings.
Transcoding settings - You can transcode clips including video correction and color adjustments by turning on the [Apply effects] switch. In this case, set [Output color space] as follows.
[Same as preview]
- Turning on the [Rename files] switch allows you to change the name of the converted clip. You can add any string before or after the clip name or change the clip name to a sequential number.
- Refer to the following section for details on the settings.
- Set a new clip name and destination folder, and then click [Export].
A new clip will be rendered with the transcoding settings you have configured. Rendering progress is displayed at the top of the screen.
Transcoding settings
- Transcode preset:
-
You can save transcoding settings as a preset and recall them.
If you want to discard the transcoding settings midway, select [Default].
If you want to delete a saved preset, click the following button next to the preset name.
 : [Delete Preset] button
- Output color space:
-
Select the color space to be applied to the converted clip.
If you want the color space and color adjustment of the transcoded clip to match the preview, select [Same as preview].
If an external monitor connection is available, you can match the settings to those of the external monitor by selecting [Same as external monitor].
- Format:
-
Select the file format after conversion.
If you select DPX, you can add a numerical index by entering a value in [Starting frame index].
- Frame size:
-
Select the frame size after conversion.
You can keep the same frame size after conversion by selecting [Same as source].
- Frame rate:
-
Select the frame rate after conversion.
You can keep the same frame rate after conversion by selecting [Same as source].
- Render preset:
-
The preset for optimal rendering will be displayed based on each of the above settings.
You can select your preferred preset.
Advanced transcoding settings
For advanced settings, turn on the [Use advanced settings] switch.
- Crop type:
-
This setting allows you to select display options when the clip frame size does not match before and after conversion. You can also apply the masking ratio you have selected previously.
None (letterbox/pillarbox) / Center crop (cut edges) / Use masking ratio
- Encode mode:
-
You can select whether to prioritize image quality or speed during encoding.
- Audio channels:
-
Set the audio channel assignment for the converted clip.
- Add custom metadata:
-
Select this option to embed custom metadata during conversion. The embedded metadata is saved as a json file in the same folder as the converted clip. To enable this option, you first need to prepare a configuration file in the default folder on your computer. Refer to the following page for details.
Preparing a custom metadata configuration file
- Burn in timecode:
-
Select this option to display a timecode on the converted clip. You can also specify where to display the timecode.
- Burn in clip name:
-
Select this option to display a clip name on the converted clip. You can also specify where to display the clip name.
- Allow burn in within letterbox/pillarbox area:
-
Select this option to display the timecode and clip name within the letterbox/pillarbox area on the converted clip. You need to turn on one or both of the following options beforehand.
[Burn in timecode]/[Burn in clip name]
- Add watermark:
-
Select this option to choose an image on your computer and display it as a watermark on the converted clip. You can also set the opacity and position of the image.
- Use flip, rotate, and desqueeze settings:
-
Select this option to keep the flip, rotation, and desqueeze settings in the converted clip. Refer to the following section for details.
Preview screen operations > Clip settings/Overlay settings
- Use mark in/out points:
-
Select this option to convert only the section of the clip specified by the mark-in and mark-out points.
- Add padding to clips:
-
Select this option to add a margin of seconds before and after the converted clip. You need to select [Use mark in/out points] beforehand.
- Transcode using proxy source clip:
-
Select this option to convert a proxy file. You can perform conversion more quickly by using a proxy file instead of a high-resolution clip.
- Override start timecode:
-
Select this option and type a number in the edit box to specify the start timecode of the converted clip. You can use this option to convert MXF-format clips to the following formats.
DNxHD/SStP/XAVC-I/XAVC-L/XDCAM
Hint
- Transcode presets are saved as “.ctranscode” files in the following folders on your computer. You can also use transcode preset files created on another computer by copying them to the following folders.
Windows: C:\Users\<Username>\Documents\Sony\Catalyst\Transcode Presets\
macOS: /Users/<Username>/Documents/Sony/Catalyst/Transcode Presets/
Note
- When setting watermarks on multiple clips with different frame sizes, using an image that fits the clip with the largest frame size will automatically adjust the image’s size and position to fit the clips with smaller frame sizes. If the image size is smaller than the frame size, it will be locked to the position specified in the [Add watermark] setting.
- A clip that shows the following icon when selected is a clip that is displayed as a single virtual clip in this software, even though it spans multiple files due to size limits.
 : Spanned clip
Clips in theXDCAM EX format that span multiple files can be transcoded directly. For AVCHD-format clips, you first need to create a new folder and copy them into that folder. Once the copy is complete and the icon above disappears, the multiple clips will be merged into a single clip. You can then transcode that clip.