


Color Adjustments
If multiple cameras are used within a single project, or if the lighting differs from shot to shot, the recorded clips can look noticeably different. You can use the color adjustment function to minimize differences between clips or to convert clips into ones with intentionally altered color tones.
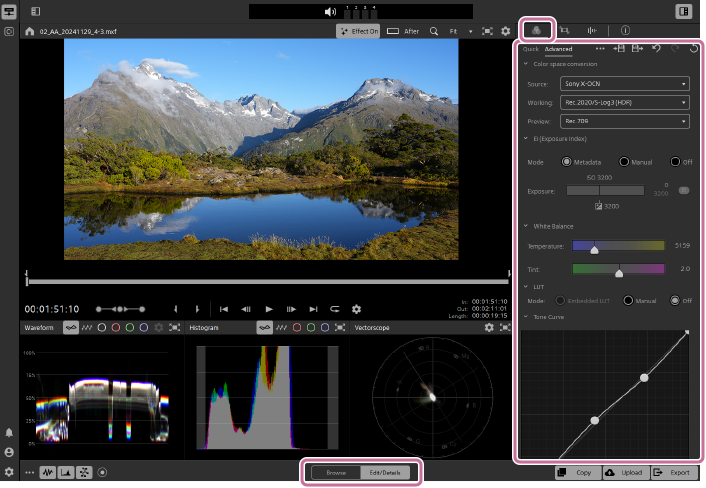
- Select a clip in the thumbnail/list panel and set the mode selector to [Edit/Details].
-
Click the [Color Adjustments] button in the upper right of the screen.
 : [Color Adjustments] button
The [Color Adjustments] panel will be displayed.
- The [Color Adjustments] panel provides the following two tabs.
[Quick] tab: For basic settings
[Advanced] tab: For advanced settings - Perform color adjustments while checking the preview screen. Refer to the following section for details.
Color adjustment settings
[Quick] tab
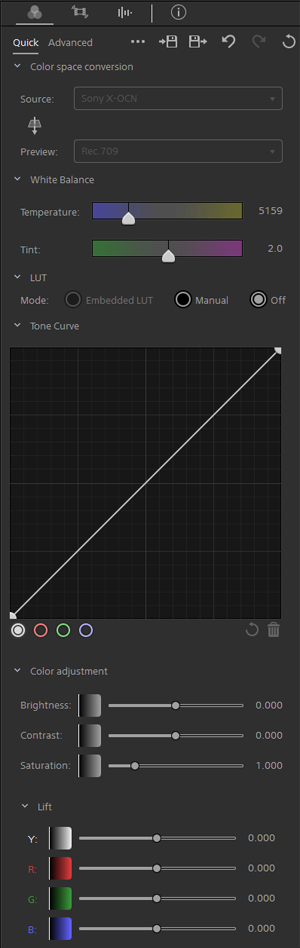
- This tab displays only basic color setting items. To view all items, select [Advanced] tab.
[Advanced] tab
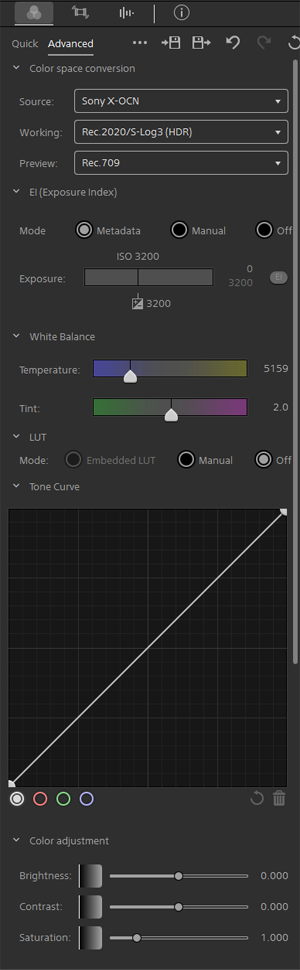
- The [Color Adjustments] panel provides the following two tabs.
-
Click the following button in the lower right of the screen to open the dialog, and then adjust the transcoding settings.
 : [Export] button
Note
- Refer to the following page for details on transcoding.
Transcoding clips - To export a clip with the color adjustment results applied, set the color space for transcoding to the following:
[Output color space]: [Same as preview]
When set to [ Same as source], the color adjustments will not be applied to the clip.
- Refer to the following page for details on transcoding.
-
Click [Export].
A clip is created with the adjustments rendered.
Color adjustment settings
The setting items vary depending on the selected clip’s status and the color space.
- Color space conversion:
-
This item displays the color space settings. To change the settings, select from the drop-down list.
[Source]: The source color space is automatically detected. Normally, there is no need to change this setting.
[Working]: This color space is used for color grading.
[Preview]: This color space is used for the preview.
- You cannot change the source color space in the [Quick] tab.
- EI (Exposure Index):
-
You can use the EI value from the metadata recorded during Log shooting. In addition, you can further adjust the exposure value based on the EI value in the metadata by using the [Exposure] slider.
[Metadata]: Select this option to use the EI value from the metadata.
[Manual]: Select this option to adjust the exposure based on the EI value in the metadata.
[Off]: Exposure adjustment will be turned off. The [Exposure] slider handle and the EI value will no longer be displayed, and the exposure value for Log shooting will be applied.
- You cannot change the EI settings in the [Quick] tab.
- White Balance:
-
You can adjust the color temperature and the color balance between green and red.
[Temperature]: Use the slider to adjust the color temperature. You can also adjust it by entering a numerical value. (2 000 K to 15 000 K)
[Tint]: Use the slider to adjust the color balance between green and red. You can also adjust it by entering a numerical value. (-100.0 to 100.0)
- Adjusting [Temperature] adjusts the red gain and blue gain based on the color temperature stored in the metadata. If no color temperature is stored in the metadata, the default setting of 3 200 K will be used.
- Adjusting [Tint] adjusts the magenta gain and green gain based on the values stored in the metadata.
- LUT:
-
You can set whether to use the LUT (look-up table) from the metadata when a LUT is applied during Log shooting.
[Embedded LUT]: Select this option to use the LUT embedded in the clip.
[Manual]: You can select LUTs from preset groups or import LUTs created in other non-linear editing software.
[Off]: LUTs will not be used.
- LUTs can be managed in groups. You can also create a new group and import LUTs using the following steps.
[Manual] > [Group ] > [Create Group]
- LUTs can be managed in groups. You can also create a new group and import LUTs using the following steps.
- Tone curve:
-
You can visually adjust the RGB channels using the tone curve. To adjust a specific channel, select the red, green, or blue button. To adjust all colors simultaneously, select the white button.
- To add a control point, click any point on the coordinate system. You can edit the tone curve by selecting and dragging a control point.
- Color Adjustments:
-
The brightness, contrast, and color of the clip can be adjusted.
Each slider is used to edit the ASC-CDL parameters.
[Brightness]: Use the slider to adjust the overall brightness.
[Contrast]: Use the slider to adjust the overall contrast.
[Saturation]: Use the slider to adjust the overall saturation.
[Lift]: Use the slider to adjust the color of the dark areas.
[Gamma]: Use the slider to adjust the color of the mid-tones.
[Gain]: Use the slider to adjust the color of the light areas.
- Using the RGB sliders, each color can be adjusted individually. The Y (luminance) slider will be adjusted along with the RGB sliders.
- Clicking the [Wheels] button displays a color scope. The color scope is linked to the [Color Adjustments] values, allowing you to intuitively adjust each value or adjust multiple colors in combination.
 : [Wheels] button
Hint
- Clicking the following button at the top of the [Color Adjustments] panel allows you to use more detailed color adjustment features. Refer to the following page for details.
Exporting color adjustment settings : [More color options] button
 - Clicking the [Undo] button will undo color adjustment operations. In addition, clicking the [Redo] button will restore an operation that was previously undone.
 : [Undo] button
 : [Redo] button
 - Clicking the [Reset] button will reset all color adjustment settings.
 : [Reset] button
 - Double-clicking on a slider will reset the adjusted values.
- Clicking the values next to a slider allows you to directly enter values.
- Dragging a slider while holding down one of the following keyboard keys allows you to fine-tune the value.
Windows: Ctrl
macOS: ⌘
Log shooting
For details on Log shooting, visit the following website.