


Copying clips
You can select a clip and copy it to another folder.
This operation can be performed from any of the following screens.
- [Browse] screen
- [Edit/Details] screen
- Select a clip you want to copy.
- You can also select multiple clips and copy them all at once.
- Click the following button in the lower right of the screen.
 : [Copy] button
The [Copy] dialog will open.
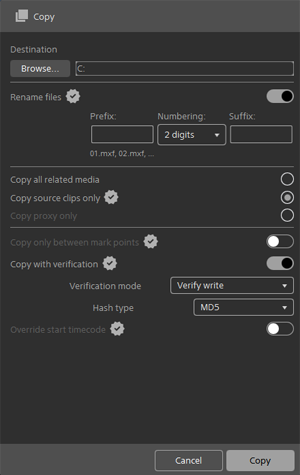
- Configure copy settings.
- Refer to the following section for details on the settings.
Copy settings - Turning on the [Rename files] switch allows you to change the name of the copied clip. You can add any string before or after the clip name or change the clip name to a sequential number.
- Refer to the following section for details on the settings.
- Specify the destination folder for the copy, and then click the [Copy] button.
The clip will be copied to the destination folder.
- You can also create a new folder from the menu that appears when you right-click in the destination folder.
Copy settings
- Copy all related media:
-
Select this option to copy all media data* associated with the selected clip.
*Metadata, proxy clips, and other files
- Copy source clips only:
-
Select this option to copy a high-resolution clip as is.
- Copy proxy only:
-
Select this option to copy only a proxy clip of the selected clip.
- Copy only between mark points:
-
Turn on this switch to copy only the video between the mark-in and mark-out points of the selected clip.
- Copy with verification:
-
Turn on this switch to verify the integrity of the clip when copying.
- Verification mode:
-
You can select one of the following verification options.
Verify write: Verifies write operations only.
Verify read/write: Verifies both read and write operations.
- Hash type:
-
You can select a hash type for verification from the following options.
MD5/SHA1/CRC32/xxHash64
- Override start timecode:
-
You can specify the start timecode. This switch is available only when copying an MXF-format clip.
Hint
- You can also copy clips by performing the following steps.
- Select [Copy] from the menu that appears when you right-click on the clip.
- Right-click in the destination folder, and then select [Paste] from the menu that appears.
- Configure the copying settings, and then click the [Paste] button.
- You can also drag clips to copy them to another folder. In this case, the clips will be copied without applying transcoding and color adjustment settings, etc.
Note
- The [Copy only between mark points] option may not function properly for some clip formats.