


Stabilization
This feature applies image stabilization effects to clips that include image stabilization metadata.
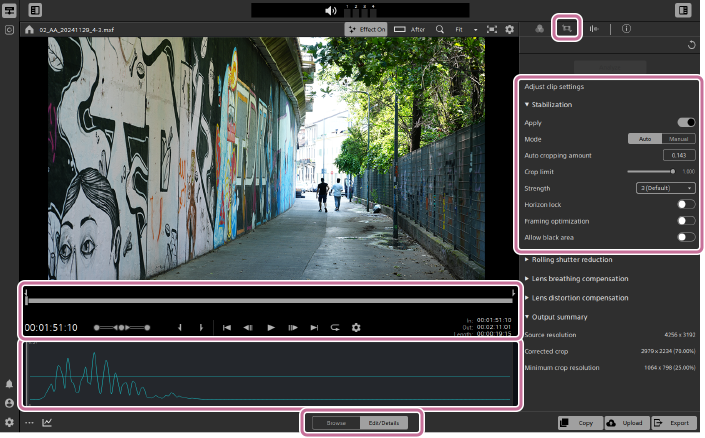
- Select a clip in the thumbnail/list panel and set the mode selector to [Edit/Details].
- Clips that include correction metadata will display the following button in the thumbnail/list panel.
 : [CONTAINS METADATA FOR] button
If clicking the [CONTAINS METADATA FOR] button displays the following icon, the clip includes image stabilization metadata.
 : [Stabilization] icon
Note
- Clips that do not contain correction metadata cannot be corrected.
- Clips that include correction metadata will display the following button in the thumbnail/list panel.
-
Click the [CLIP ADJUSTMENTS] button in the upper right of the screen.: [CLIP ADJUSTMENTS] button
The [Adjust clip settings] panel will be displayed.
- When opening a clip that contains correction metadata, you will first be prompted to analyze the clip. Click the following button at the top of the panel.
 : [Analyze] button
- When opening a clip that contains correction metadata, you will first be prompted to analyze the clip. Click the following button at the top of the panel.
-
Specify the range to apply correction by setting mark-in and mark-out points on the trackbar.
- Refer to the following page for details on using the trackbar.
Preview screen operations
- Refer to the following page for details on using the trackbar.
-
Turn on the [Apply] switch.
Settings related to image stabilization will be displayed. Refer to the following section for details on the settings.
Image stabilization settings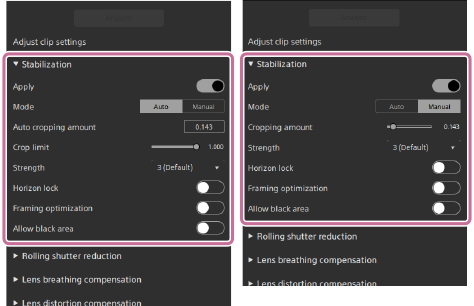
-
Click the following button at the top of the panel.: [Analyze] button
- If you have already performed analysis, the [Analyze] button may not be displayed.
-
Adjust the settings while checking the clip in the preview.
- While checking the preview after applying the correction, repeatedly adjust the settings and analyze the clip until you get the desired result.
Information regarding the correction output will be displayed. Refer to the following section for details.
Output summary items - Once the analysis is complete, a timeline-based image stabilization graph will be displayed. This graph can be used as a guide when you manually set the cropping amount. Refer to the following section for details.
Image stabilization graph view
Note
- Depending on your operating environment, the image after correction may appear as a black screen.
- While checking the preview after applying the correction, repeatedly adjust the settings and analyze the clip until you get the desired result.
-
Click the following button in the lower right of the screen to open the dialog, and then adjust the transcoding settings.
 : [Export] button
Note
- Refer to the following page for details on transcoding.
Transcoding clips
- Refer to the following page for details on transcoding.
-
Click [Export].
The results of the clip adjustments will be rendered to the specified clip.
Image stabilization settings
- Mode:
- You can select between automatic and manual. When you select automatic, [Auto cropping amount] will be locked to the value of the part of the clip with the most significant blur. When you select manual, you can use the [Cropping amount] slider to set the cropping amount as you like.
- Crop limit:
- Drag the slider to set the cropping amount that can be applied to correct the clip.
- If the result of the automatic clip adjustment exceeds the set value, the crop limit will be used.
- If the result of the automatic clip adjustment is smaller than the set value, the automatic adjustment result will be used.
- Strength:
- You can select the strength of image stabilization between 1 and 5. The higher the strength, the greater the amount of image cropping.
- Horizon lock:
- This setting corrects horizontal tilt. You can also manually adjust the roll angle using the adjustment slider.
- If you click the [CONTAINS METADATA FOR] button in the thumbnail/list panel, and the following icon appears, the clip contains horizontal lock metadata.
: [CONTAINS METADATA FOR] button
 : [Horizon lock] icon
 - The preview will update in real time while you adjust the roll angle. Operate the slider while ensuring the image is horizontal.
- When the [Horizon lock] switch is turned off, the adjustment slider will not be displayed. In this case, the roll angle will be 0 degrees.
- Setting a low cropping amount may reduce the effectiveness of horizontal lock.
- If you click the [CONTAINS METADATA FOR] button in the thumbnail/list panel, and the following icon appears, the clip contains horizontal lock metadata.
- Framing optimization:
- This setting suppresses the phenomenon where the cropping amount increases and the angle of view narrows due to camera movement, maintaining a wide angle of view while preserving correction performance.
- Allow black area:
- This setting removes the limit on the cropping amount for image stabilization and increases the image stabilization effect. However, a black border may appear around the image.
Output summary items
- Source resolution:
- The frame size of the source data before cropping will be displayed.
- Corrected crop:
- The size of the corrected frame after cropping will be displayed.
- Minimum crop resolution:
- When the cropping mode is set to automatic, the minimum size of the corrected frame will be displayed according to the [Crop limit] setting.
Image stabilization graph view
You can adjust the image stabilization settings while visually checking the amount of camera shake within the clip.
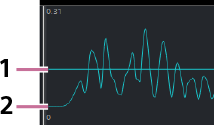
- This line indicates the cropping amount of the image. When [Mode] is set to automatic, it will be displayed as a solid line. When set to manual, it will be displayed as a dashed line.
- This line indicates the amount of image stabilization obtained from clip analysis.