Pairing and connecting with a computer (Windows 8.1)
The operation to register the device that you wish to connect to is called “pairing”. First, pair a device to use it with the headset for the first time.
Before starting the operation, make sure of the following:
- Your computer has a Bluetooth function that supports music playback connections (A2DP).
- The computer is placed within 1 m (3 feet) of the headset.
- The headset is charged sufficiently.
- The operating instructions of the computer is in hand.
- Depending on the computer you are using, the built-in Bluetooth adaptor may need to be turned on. If you do not know how to turn on the Bluetooth adaptor or are unsure if your computer has a built-in Bluetooth adaptor, refer to the operating instructions supplied with the computer.
-
Remove both units of the headset from the charging case.
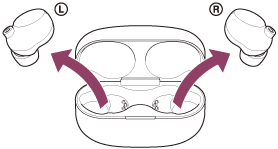
The headset turns on automatically.
-
Enter pairing mode on this headset.
When you pair the headset with a device for the first time after purchase or after initializing the headset (if the headset has no pairing information), the headset enters pairing mode automatically if you remove the headset from the charging case. In this case, put the headset units into both ears and proceed to step 3.
When you pair a second or subsequent device (if the headset has pairing information for other devices), put the headset units into both ears, then hold your fingers to the touch sensors on both the left and right units for about 5 seconds.
When the touch sensors have been operated correctly, a beep will sound.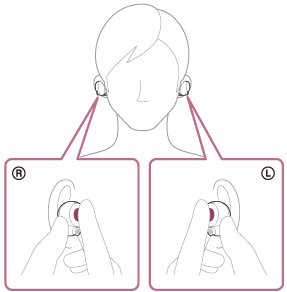
You will hear the voice guidance say, “Bluetooth pairing”, from both headset units.
-
Wake the computer up if the computer is in standby (sleep) or hibernation mode.
-
Register the headset using the computer.
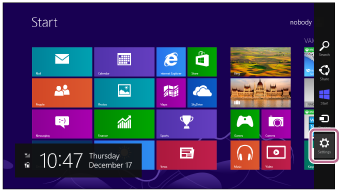
- Move the mouse pointer to the top-right corner of the screen (when using a touch panel, swipe from the right edge of the screen), then select [Settings] from the Charm Bar.
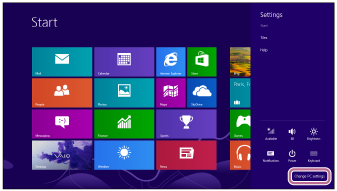
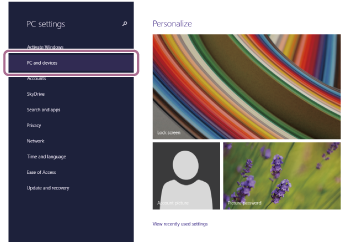
- Select [Change PC Settings] of the [Settings] charm.
- Select [PC and devices] of the [PC Settings] screen.
- Select [Bluetooth].

- Select [WF-1000XM4], then select [Pair].
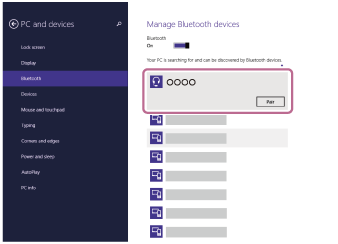
If Passkey (*) input is required, input “0000”.
The headset and computer are paired and connected with each other.
You will hear the voice guidance say, “Bluetooth connected”, from both headset units.
If they are not connected, see “Connecting to a paired computer (Windows 8.1)”.
If [WF-1000XM4] does not appear on the computer screen, try again from the beginning of step 4.
*A Passkey may be called “Passcode”, “PIN code”, “PIN number”, or “Password”.
- Move the mouse pointer to the top-right corner of the screen (when using a touch panel, swipe from the right edge of the screen), then select [Settings] from the Charm Bar.
Hint
- The operation above is an example. For more details, refer to the operating instructions supplied with the computer.
- To delete all Bluetooth pairing information, see “Initializing the headset to restore factory settings”.
Note
- If pairing is not established within 5 minutes, pairing mode is canceled. In this case, set the headset into the charging case, and start the operation again from step 1.
- Once Bluetooth devices are paired, there is no need to pair them again, except in the following cases:
- Pairing information has been deleted after repair, etc.
- When a 9th device is paired.
The headset can be paired with up to 8 devices. If a new device is paired after 8 devices are already paired, the registration information of the paired device with the oldest connection date is overwritten with the information for the new device. - When the pairing information for the headset has been deleted from the Bluetooth device.
- When the headset is initialized.
All of the pairing information is deleted. In this case, delete the pairing information for the headset from the connected device and then pair them again.
- The headset can be paired with multiple devices, but can only play music from 1 paired device at a time.