Structure of the [Planning] Screen
The [Planning] screen displays the shooting plans in list view. Shooting plans can be received from a Newsroom Computer System (NRCS) or created by this service. This screen is used to send the shooting plan selected in the list to a camcorder or user.
Note
- In C3 Portal, a shooting plan is referred to as a “story.”
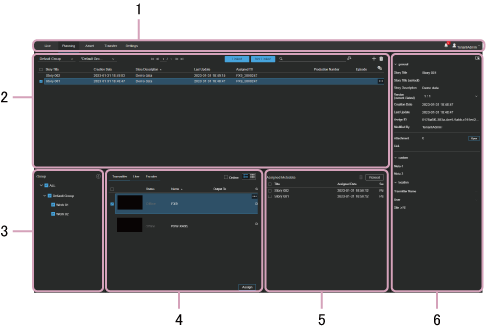
1. Global menu
Click the tabs to move between screens.
- [Live]: Display the [Live] screen.
- [Planning]: Display the [Planning] screen.
- [Asset]: Display the [Asset] screen.
- [Transfer]: Display the [Transfer] screen.
- [Settings]: Display the [Settings] screen.
-
 (Notification): Displays notifications to the user. Press
  (Mark as Read) to mark a notification as read. Press [Mark all as read] to mark all notifications as read. Press [Delete all] to delete all notifications.
 -
 (User settings): Sign out, display account settings, display the Help Guide, display the download page of the NRCS Gateway Server App or C3 Portal Panel module, or display the privacy policy and terms of use.
2. Story operation area
Used to search and select a story, and to create and edit a story. It can also be used to send a story to a camcorder or user. Select a group and planning interface from the drop-down lists to display the corresponding stories. If many stories are displayed, the display is split into separate pages.
- Group drop-down list: Select a group.
- Planning interface drop-down list: If there are multiple planning interfaces registered for the group selected in the group drop-down list, select the planning interface to display. “*” is displayed at the start of the default planning interface created automatically when each group is created.
- [Linked] button: When the button is pressed and enabled (lit blue), the stories linked to the bin are displayed in the story list.
- [Not Linked] button: When the button is pressed and enabled (lit blue), the stories not linked to the bin are displayed in the story list.
Note
- The [Linked] button and [Not Linked] button do not operate together, but function independently.
-
 (Search): Search for stories matching the entered character string and display the search results. Pressing the
  (Advanced Search) button allows you to search for specific metadata values.
 -
 (Create Story): Create a story. Click the [Import] button in the displayed dialog to import a story from a call sheet created separately.
 -
 (Delete Story): Delete the selected story.
 -
 (Column Settings): Select the items to display in the story operation area.
 - Story list: Displays a list of stories and associated information. The following content is displayed in the [Status] column.
- Registered: Story is not assigned to a camcorder/user/encoder.
- Assigned: Story is assigned to a camcorder, but is not sent. Or is assigned to a user/encoder.
- Complete: Story is assigned and sent to all camcorders. If the story is assigned to a user, this is the state after using [Send & Load] from the web screen of a mobile device.
- Error: Story could not be sent to a camcorder for some reason.
3. [Group] area
Select a group in the tree view to display the camcorders/users/encoders registered in the group in the assignment selection area.
4. Assignment selection area
Select the camcorder, user, or encoder to which to assign a story.
Click the [Assign] button to assign the story to the selected camcorder, user, or encoder.
[Transmitter] tab
Displays the camcorders to which a story can be assigned.
Click a thumbnail and select [Planning Metadata in TX] to display a list of the stories sent to the camcorder. You can select a story on this screen to load it into a camcorder displayed in the list.
- [Online] checkbox: Place a check mark here to display only those camcorders that are online.
-
 (List View) button: Display the devices in list view.
 -
 (Grid View) button: Display the devices in grid view.
[User] tab
Displays the users to which a story can be assigned.
[Encoder] tab
Displays the encoders to which a story can be assigned.
5. [Assigned Metadata] area
Displays the story assigned to the camcorder, user, or encoder selected in the assignment selection area.
Note
- The status display in the [Assigned Metadata] area is not updated automatically. To update the display, click the [Reload] button.
6. Story information area
Displays information for the story selected in the story operation area.
Click the  (Edit) button to edit the displayed story.