Structure of the [Transfer] Screen
The [Transfer] screen is used to transfer proxy files from a camcorder or the mobile app to C3 Portal, and to upload high-resolution (High-Res) files to an FTP server. It is also used to specify the clips to transfer and to control transfer jobs.
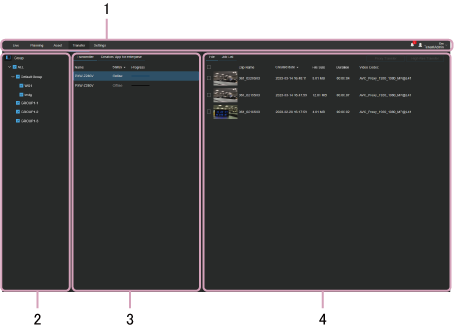
1. Global menu
Click the tabs to move between screens.
- [Live]: Display the [Live] screen.
- [Planning]: Display the [Planning] screen.
- [Asset]: Display the [Asset] screen.
- [Transfer]: Display the [Transfer] screen.
- [Settings]: Display the [Settings] screen.
-
 (Notification): Displays notifications to the user. Press
  (Mark as Read) to mark a notification as read. Press [Mark all as read] to mark all notifications as read. Press [Delete all] to delete all notifications.
 -
 (User settings): Sign out, display account settings, display the Help Guide, display the download page of the NRCS Gateway Server App or C3 Portal Panel module, or display the privacy policy and terms of use.
2. [Group] area
Displays groups in tree view. Select a group that contains the devices to display in the source area.
3. Source area
[Transmitter] tab
Displays the camcorders on which files to transfer are stored in list view.
[Creators’ App for enterprise] tab
Displays the mobile apps logged in to C3 Portal in list view.
4. File display area
[File] tab
Displayed only when the [Transmitter] tab is selected in the source area. Displays a list of files stored on the device selected in the source area. Files in the list with “Chunk” displayed on the thumbnail are files that were recorded in chunk file transfer mode. Select files to transfer by placing a check mark in the checkbox beside each file.
- [Proxy Transfer] button: Adds the proxy file for the selected file to the transfer job list. Files are transferred to the server specified on the [Upload] page of the [Settings] screen. The transferred files are saved in the [Upload] bin on the [Asset] screen in the same way as when using the camcorder auto upload function. Selection of the transfer destination in the GUI is not required.
- [High-Res Transfer] button: Adds the high-resolution file for the selected file to the transfer job list. Select the transfer destination server from among the external servers registered as upload destinations on the camcorder.
- [Preview] button: Displays the selected file on the preview screen. You can mark an In-point and Out-point on the preview screen to transfer that portion only. Essence marks and metadata are also displayed on the preview screen.
Note
- The [Preview] button is displayed above the list when a file is selected.
- The [Proxy Transfer] button and [High-Res Transfer] button can also be selected from the context menu displayed by clicking
 (Menu) in the list.
 - If the camcorder is a PXW-Z280/Z190/FX9/Z750/Z450/X400, the transfer destination registered in C3 Portal is also displayed as the transfer destination for High-Res transfer.
[Job List] tab
Displays a list of file transfer jobs and the current transfer status.
- [Delete]: Delete the selected job from the list.
- [Clear Completed Jobs]: Delete jobs from the list after completion of transfer to an FTP server.