Structure of the [Asset] Screen
The [Asset] screen displays information about assets.
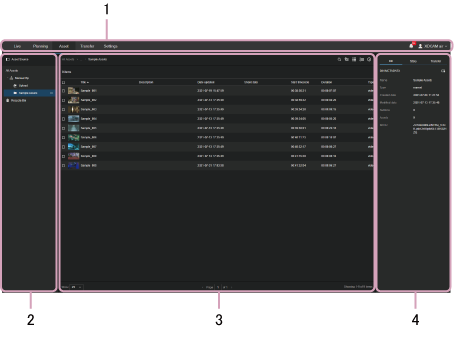
List display
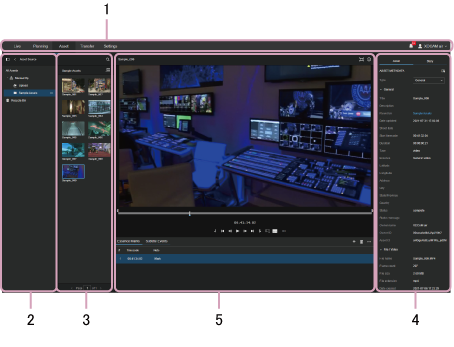
Preview display
Storyboard display
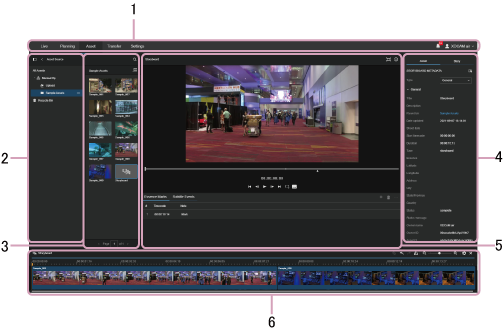
1. Global menu
Click the tabs to move between screens.
- [Live]: Display the [Live] screen.
- [Planning]: Display the [Planning] screen.
- [Asset]: Display the [Asset] screen.
- [Transfer]: Display the [Transfer] screen.
- [Settings]: Display the [Settings] screen.
-
 (Notification): Displays notifications to the user. Press
  (Mark as Read) to mark a notification as read. Press [Mark all as read] to mark all notifications as read. Press [Delete all] to delete all notifications.
 -
 (User settings): Sign out, display account settings, display the Help Guide, display the download page of the NRCS Gateway Server App or C3 Portal Panel module, or display the privacy policy and terms of use.
2. Tree panel
Displays the bins in which assets are stored in tree view.
The status of FTP file transfer is indicated by the color of the bin icons.
Selecting a bin and selecting the  (Menu) button displays the context menu.
- Create bin: Create a new bin.
- [Rename bin]: Rename the bin.
- [Upload files]: Upload files to the bin.
- [Create storyboard]: Create a new storyboard.
- [Transfer settings]: Select the FTP server, S3 storage, or Sony Ci service for transferring assets in the bin.
- [Link story]: Link the story metadata to the bin.
- [Delete bin]: Delete the bin.
3. Asset list
Displays the assets stored in the bin selected in the tree panel. If many assets are displayed, the display is split into separate pages.
You can move/copy assets between bins using drag & drop.
Hovering the mouse over a thumbnail displays a simple preview. A line indicating the playback position is displayed on the thumbnail.
Pressing [Shared link] displays a list of created shared links in a dialog.
Use the following buttons to change the content displayed in the asset list.
-
 (Search) button: Click and enter a character string to search for assets. You can click the
  (Advanced Search) button to filter the assets displayed.
 -
 (Column Settings) button: Select the items to display in the asset list.
 -
 (List View) button: Display the assets in list view.
 -
 (Grid View) button: Display the assets in grid view.
 -
 (Sort order) button: Change the display order of the assets.
 -
 (Properties) button: Show/hide the information panel.
Note
- When entering a character string to search for that contains “" \ ( )” characters, the characters must be escaped. For example, to search for “"”, enter “\"”.
Use the following buttons for operations on the selected asset.
-
 (Share) button: Create a shared link for an asset.
 -
 (Preview) button: Display the asset details screen and preview the asset.
 -
 (Create Storyboard) button: Create a new storyboard.
 -
 (Download) button: Download the asset. You can select the file to download and the file name.
 -
 (Delete) button: Delete the asset.
Note
- When an interlaced proxy file is displayed in a browser and the zoom factor is changed, the displayed image may become distorted.
4. Information panel
Displays the metadata for the bin selected in the tree panel or the metadata for the asset selected in the asset list together with the linked story metadata. The transfer settings are also displayed when a bin is selected. The metadata, story metadata, and transfer settings can be edited.
Note
- If the same metadata is edited simultaneously by more than one client, the last saved contents become valid.
5. Preview area
Displays a preview of the asset.
The preview area is displayed by selecting an asset and clicking the (Preview) button.
You can mark In-points and Out-points in the preview area.
You can use marked In-points and Out-points to add an asset to the storyboard, transfer high-resolution clips from a camcorder by FTP, or create an asset subclip during asset chunk file transfer.
You can also perform essence mark operations or add subtitles.
6. Timeline
Use to edit a storyboard.
The timeline is displayed by creating a storyboard in the asset list or by selecting a created storyboard.
Storyboard operations
The following shortcut keys are supported on the storyboard.
| Shortcut keys | Operation |
|---|---|
| Space key | Toggle play/pause |
| S | Toggle full-screen video |
| . (period), → (right arrow) key | Step 1 frame forward |
| , (comma), ← (left arrow) key | Step 1 frame backward |
| L, F | Shuttle forward |
| K | Pause playback |
| J, D | Shuttle reverse |
| M | Add essence mark |
| Ctrl+M | Move to next essence mark |
| Shift+Ctrl+M | Move to previous essence mark |
| Ctrl+Alt+M | Delete essence mark |
| Shift+Ctrl+Alt+M | Delete all essence marks |
| I | Mark In-point |
| O | Mark Out-point |
| Page Up key | Move up in essence mark table |
| Page Down key | Move down in essence mark table |
| R, Ctrl+K | Razor edit cut at the playhead location |