Function menu in the [Pro photo] mode
Tap [Fn] to open the function menu. To close the function menu, tap [Fn] again.
![Image showing where each icon is located on the Function menu in the [Pro photo] mode of the Camera app. Upper row from left to right, 1 to 6. Lower row from left to right, 7 to 12.](image/scr-245-camera-pro-function-menu.png)
-
Drive mode
Self-timer: 10 sec / Self-timer: 3 sec
Single shooting
Continuous shooting: Lo: Shoots images continuously while you touch and hold the screen shutter button or long press the device shutter button. The speed reaches a maximum of 10 images per second.
Continuous shooting: Hi: Shoots images continuously while you touch and hold the screen shutter button or long press the device shutter button. The speed reaches a maximum of 20 images per second.
Continuous shooting: Hi+: Shoots images continuously while you touch and hold the screen shutter button or long press the device shutter button. The speed reaches a maximum of 30 images per second.
HDR continuous shooting: Lo: Shoots HDR images continuously while you touch and hold the screen shutter button or long press the device shutter button. The speed reaches a maximum of 10 images per second.
HDR continuous shooting: Hi: Shoots HDR images continuously while you touch and hold the screen shutter button or long press the device shutter button. The speed reaches a maximum of 20 images per second.
Note
- The speed of continuous shooting decreases when the buffer memory of your device becomes full.
Hint
- You can set whether to display the continuous shooting feedback indicator. Tap [MENU] > [Shooting], and then tap the [Continuous shooting feedback] switch.
- To select the best from multiple shots, tap the thumbnail to view the results, select the image that you want to save by scrolling through the images you shot, and then tap
 (Burst icon) and select an option.
 - To cancel the Self-timer, tap the Drive mode button, and then select [Single shooting].
-
Focus mode
Single-shot AF: Use [Single-shot AF] when the subject is motionless. Press the device shutter button halfway down to focus on a subject. The focus remains locked until you stop pressing the device shutter button halfway down.
Continuous AF: Use [Continuous AF] when the subject is in motion. The camera continues to focus while you press the device shutter button halfway down.
Manual Focus: Adjusts the focus manually using the slider in the viewfinder. You can also tap
 (Focus near icon) or
  (Focus far icon) to make finer adjustments. To adjust the focus by enlarging the image, tap
  (Focus magnifier icon) and drag the viewfinder to move the magnified area or double-tap the area you want to magnify. If you cannot focus on the intended subject using the auto focus, use the manual focus.
 -
Focus area
Wide: Automatically focuses on the whole range of the screen.
Center: Automatically focuses on a subject in the center of the image.
Focus and tracking: If you select an object to focus on and track by touching it in the viewfinder, the camera will focus on the object and start tracking it when you press the device shutter button halfway down.
Hint
- You can select the color of the focus area. Tap [MENU] > [Focus] > [Focus area color], and then select an option.
-
Computational photo
Auto / Off: The camera automatically identifies the scene and overlaps multiple photos to take beautiful automatic shots with reduced blur, noise, overexposure, and underexposure.
-
DRO/Auto HDR
D-Range Optimizer: Optimizes brightness and gradation by analyzing the contrast between the subject and the background from a single image.
Auto HDR: Optimizes brightness and gradation by overlaying multiple images shot using different exposures.
Off
-
Metering mode
Multi: Measures light on each area after dividing the total area into multiple areas and determines the proper exposure of the entire screen (Multi-pattern metering).
Center: Measures the average brightness of the entire screen, while emphasizing the central area of the screen (Center-weighted metering).
Spot: Measures only inside the metering circle.
-
Face/Eye AF
Face/Eye AF / Face AF / Off
The camera detects the faces or eyes of people and animals and focuses on them automatically.
When the camera detects the faces of people or animals, a detection frame appears. Tap the face on which you want to focus, and then press the device shutter button halfway down to focus. The detection frame will turn green, and the camera will focus on the face or one of the eyes you selected.
-
Creative look
ST / NT / VV / FL / IN / SH: Optimized with a different combination of color tone, saturation, contrast, sharpness, brightness, and other image elements, so you can set up image processing with your ideal balance of these elements. For details about each preset look, tap
 (Read more button).
 -
Flash
Off / Auto / On / Light
-
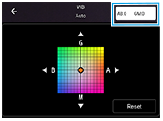
WB
Auto / Cloudy / Daylight / Fluorescent / Incandescent / Shade: Adjusts the color tones according to the selected light source that is illuminating the subject (preset white balance). To finely adjust the color tones, tap the [AB, GM] button to display the fine adjustment screen, and then move the orange dot to the desired position. After adjusting, tap the button again to close the fine adjustment screen.
Temp 1 / Temp 2 / Temp 3: Memorizes white balance settings defined in terms of color temperature. Tap the color temperature (K) button to adjust the color temperature using the dial. Tap the [AB, GM] button to finely adjust the color tone using the fine adjustment screen. After adjusting, tap the button again to close the fine adjustment screen.
Custom 1 / Custom 2 / Custom 3: Memorizes the basic white color under the light conditions for the shooting environment. To adjust the basic white color, select one of the items, tap [Set], and then follow the on-screen instructions.
-
File format
RAW: Digital processing is not performed on this file format. Select this format to process images on a computer for professional purposes.
RAW & JPEG: A RAW image and a JPEG image are created at the same time. This is suitable when you need two image files, a JPEG for viewing, and a RAW for editing.
JPEG: The image is recorded in the JPEG format.
-
Peaking
On / Off: Peaking helps you to check the focus by enhancing the outlines of in-focus areas.
Hint
- You can select the peaking color. Tap [MENU] > [Focus] > [Peaking color], and then select an option.
To re-assign or re-order setting items in the function menu
- Tap [MENU] > [Setup] > [Function menu customization (photo)].
- Follow the on-screen instructions.