Function menu in the [Pro video] mode
Tap [Fn] to open the function menu. To close the function menu, tap [Fn] again.
![Image showing where each icon is located on the Function menu in the [Pro video] mode of the Camera app. Upper row from left to right,1 to 6. Lower row from left to right, 7 to 12.](image/scr-245-camera-pro-video-function-menu.png)
-
Resolution
4K / Full HD / HD
-
Frame rate
24 fps / 30 fps / 60 fps / 120 fps
-
Focus mode
Continuous AF: Use [Continuous AF] when the subject is in motion. The camera will focus continuously.
Manual Focus: Adjusts the focus manually using the slider in the viewfinder. You can also tap
 (Focus near icon) or
  (Focus far icon) to make finer adjustments. If you cannot focus on the intended subject using [Continuous AF], use [Manual Focus].
 -
Product showcase
On / Off: The camera settings are optimally configured for video recordings such as product reviews. The camera tends to focus on objects displayed in the center of the viewfinder.
-
Dynamic range
Wide / Standard: When [Wide] is selected, you can record videos with a wide dynamic range by using image processing that combines multiple frames.
-
Mic
You can select which mic to use while recording videos.
All directions (stereo): Ideal for capturing sound from all sides or directions, such as environmental sound.
Voice priority (rear): Ideal for capturing voice or sound from the subject when recording with the main camera. Touch the rear panel as little as possible during recording to avoid noise being recorded.
-
Face/Eye AF
Face/Eye AF / Face AF / Off
The camera detects the faces or eyes of people and animals and focuses on them automatically.
When the camera detects the faces of people or animals, a detection frame appears. To change the focus target, tap the face of the subject on whom you would like to focus.
-
Look
Creative look : ST / Creative look : NT / Creative look : VV / Creative look : FL / Creative look : IN / Creative look : SH / S-Cinetone for mobile: Optimized with a different combination of color tone, saturation, contrast, sharpness, brightness, and other image elements, so you can set up image processing with your ideal balance of these elements. For details about each preset look, tap
 (Read more button).
 -
HDR/SDR format
Enable HDR (High Dynamic Range) to make your videos appear more dramatic and closer to what you see in real life.
HDR(HLG/BT.2020): Video is recorded with a combination of HLG for the gamma curve and BT.2020 for the color space.
SDR(BT.709): Video is recorded with a combination of the standard gamma curve and BT.709 for the color space.
-
WB
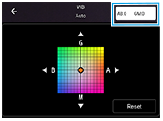
Auto / Cloudy / Daylight / Fluorescent / Incandescent / Shade: Adjusts the color tones according to the selected light source that is illuminating the subject (preset white balance). To finely adjust the color tones, tap the [AB, GM] button to display the fine adjustment screen, and then move the orange dot to the desired position. After adjusting, tap the button again to close the fine adjustment screen.

Temp 1 / Temp 2 / Temp 3: Memorizes white balance settings defined in terms of color temperature. Tap the color temperature (K) button to adjust the color temperature using the dial. Tap the [AB, GM] button to finely adjust the color tone using the fine adjustment screen. After adjusting, tap the button again to close the fine adjustment screen.
Custom 1 / Custom 2 / Custom 3: Memorizes the basic white color under the light conditions for the shooting environment. To adjust the basic white color, select one of the items, tap [Set], and then follow the on-screen instructions.
-
Stabilization
High quality / Standard / Off: You can record smooth, shake-free videos. To get the most powerful stabilization effect, select [High quality]. If you select [Standard], the stabilization effect will be weakened, but you can record videos with a slightly wider angle of view.
-
Peaking
On / Off: Peaking helps you to check the focus by enhancing the outlines of in-focus areas.
Hint
- You can select the peaking color. Tap [MENU] > [Focus] > [Peaking color], and then select an option.
To re-assign or re-order setting items in the function menu
- Tap [MENU] > [Setup] > [Function menu customization (video)].
- Follow the on-screen instructions.
