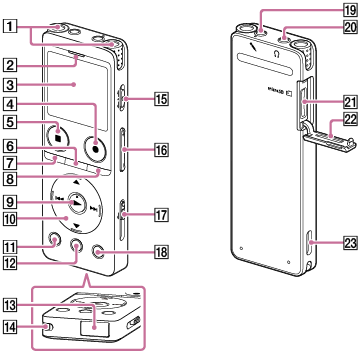
Parts and controls
-
Built-in microphones
-
Operation indicator
-
Display window
-
 REC/PAUSE (record/pause) button
 -
 STOP button
 -
T-MARK (track mark) button
-
BACK/
 HOME button
(You can return to the previous screen or item by pressing this button quickly and you can also return to the HOME menu by pressing and holding this button.)
-
OPTION button
-
 (play) button (*1)
 -
Control button
The following 4 buttons, collectively, are called the control button.
 (move up)/DPC button
 (move down)/
 A-B (repeat A-B) button
 (cue/fast forward) button
 (review/fast backward) button
 -
EASY SEARCH(SEC) -3 button
-
EASY SEARCH(SEC) +10 button
-
USB connector cover (You can find the USB connector retracted behind the cover.)
-
Strap hole (No strap is supplied with your IC recorder.)
-
POWER・HOLD switch (*2)
-
VOL -/+ (volume -/+) button (*1)
-
USB slide lever
-
JUMP button
-
 (microphone) jack (*1)
 -
 (headphones) jack
 -
microSD card slot (The card slot is located under the cover.)
-
Slot cover
-
Built-in speaker
*1 The (play) button, VOL + (volume +) button, and (microphone) jack have a tactile dot. Use the tactile dot as a reference when operating the IC recorder.
*2 Sliding the POWER・HOLD switch to [POWER] and holding it for 8 seconds or longer restarts your IC recorder. For details, see Restarting the IC recorder.
The contents of the Help Guide may be subject to change without notice due to updates to the product's specifications.