Top side
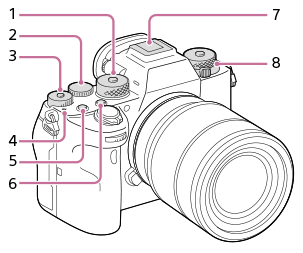
- Mode dial
The mode dial is unlocked while you hold down the unlock button at the center.
- Rear dial
You can quickly adjust the settings for each shooting mode.
- Exposure compensation dial
Pressing the lock button at the center switches the exposure compensation dial between the locked and unlocked status. The dial is unlocked when the lock button is popped up and the white line is visible.
-
 Image sensor position mark
- The image sensor is the sensor that converts light into an electric signal. The mark shows the location of the image sensor. When you measure the exact distance between the camera and the subject, refer to the position of the horizontal line.

- If the subject is closer than the minimum shooting distance of the lens, the focus cannot be confirmed. Make sure you put enough distance between the subject and the camera.
- The image sensor is the sensor that converts light into an electric signal. The
- C1 button (Custom button 1)
- C2 button (Custom button 2)
- Multi Interface Shoe*
Some accessories may not go in all the way and protrude backward from the Multi interface shoe. However, when the accessory reaches the front end of the shoe, the connection is completed.
-
Upper: Drive mode dial
The drive mode dial is unlocked while the unlock button at the center is being pressed.
Lower: Focus mode dial
The focus mode dial is unlocked while the unlock button at the front is being pressed.
* For details on compatible accessories for the multi interface shoe, visit the Sony website, or consult your Sony dealer or local authorized Sony service facility. Accessories for the Accessory Shoe can also be used. Operations with other manufactures’ accessories are not guaranteed.