Shooting movies
Explains how to record movies.
This product cannot record audio.
- Set the Still/Movie/S&Q switch to
 (Movie) to select the movie recording mode.
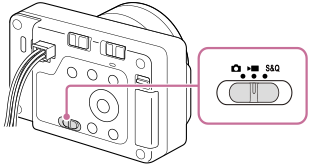
- MENU →
 (Shooting) → [Shooting Mode] → [Shoot Mode] → desired shooting mode.
 - Press the shutter/MOVIE (Movie) (A) button to start recording.
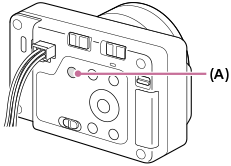
- Press the shutter/MOVIE (Movie) button again to stop recording.
To select the recording format (
File Format)
The resolution and degree of compatibility vary depending on the recording format (XAVC HS 4K/XAVC S 4K/XAVC S HD/XAVC S-I 4K/XAVC S-I HD). Select the format in accordance with the purpose of the movie to be shot.
To select the frame rate or image quality (
Movie Settings)
The frame rate determines the smoothness of motion in movies.
([Movie Settings] → [Rec Frame Rate])
The image quality changes with the bit rate. ([Movie Settings] → [Record Setting])
If the bit rate is high, the amount of information will increase and you can shoot high-quality movies. However, this will result in a larger volume of data.
Select the frame rate and bit rate according to your preference and purpose.
To adjust the exposure (
Shoot Mode)
You can select the exposure mode in [Shoot Mode]. Select the exposure mode through the combination of a shutter speed and aperture value.
To select the focusing method (
 Focus Mode/
Focus Area)
Focus Mode/
Focus Area)
Select  (Continuous AF) or
  (Manual Focus) for [Focus Mode].
You can specify the focus area by setting [Focus Area].
(Manual Focus) for [Focus Mode].
You can specify the focus area by setting [Focus Area].
Even during shooting with manual focus, you can temporarily switch to auto focus in the following ways.
- Press the custom key to which [AF On] is assigned, or press the shutter button halfway.
- Press the custom key to which [Subject Recognition AF] is assigned.
Hint
- You can change the settings for ISO sensitivity, exposure compensation, and focus area while shooting movies.
- To prevent the operating sound of the zoom ring from being recorded when a power zoom lens is used, we recommend recording movies using the zoom lever of the lens. When moving the zoom lever of the lens, be careful not to flip the lever.
Note
- An icon indicating that data is being written is displayed on the external monitor after shooting. Do not remove the memory card while the icon is displayed.
- You cannot start recording a movie while writing data. Wait until data writing is completed and “STBY” is displayed before recording a movie.
- If the
 (Overheating warning) icon appears on the external monitor, the temperature of the camera has risen. Turn the power off and cool the camera and wait until the camera is ready to shoot again.
 - The temperature of the camera tends to rise when shooting movies continuously, and you may feel that the camera is warm. This is not a malfunction. Also, [Internal temp. high. Allow it to cool.] may appear. In such cases, turn the power off and cool the camera and wait until the camera is ready to shoot again.
- For the continuous shooting time of a movie recording, refer to “Recordable movie times.” When movie recording is finished, you can record another movie by pressing the shutter/MOVIE (Movie) button again. Recording may stop to protect the product, depending on the temperature of the product. In such cases, turn the power off and cool the camera and wait until the camera is ready to shoot again.
- Still images cannot be captured during movie recording.
- When the power is turned on, the internal temperature of the camera rises even if the camera is not shooting. If the power is turned on for a long time, then the power turns off or you are unable to record movies, leave the power off and wait until the temperature drops sufficiently.