Connecting an external monitor
By connecting an external monitor to the camera with an HDMI cable (sold separately), you can display the setting screen and Live View of the camera. For details on operating the external monitor, refer to the operating instructions supplied with the external monitor.
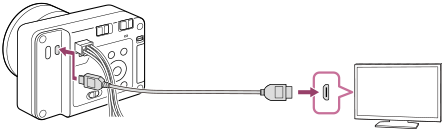
- Turn off both the camera and the external monitor.
- Connect the HDMI micro jack on the camera to the HDMI jack on the external monitor with an HDMI cable (sold separately).Use an HDMI cable that is compatible with the HDMI Type-D micro jack on the camera and the HDMI jack on the external monitor.
Note
- Do not connect the camera and another device using the output terminals of both. Doing so may cause a malfunction.
- Some devices may not work properly when connected to the camera. For example, they may not output video or [Screen Reader] audio.
- Use an HDMI cable with the HDMI logo or a genuine Sony cable.
- You can configure HDMI settings using the Camera Remote SDK.
- During HDMI output, when you switch the movie from 4K to HD image quality or vice-versa, or change the movie to a different frame rate or different color mode, the screen may become dark. This is not a malfunction.
- With the image quality of HDMI output, you may see flickering (moiré patterns or jaggies) in fine lines, etc. Check the image recorded on the SD card for the actual image quality.
- If the product performs unwanted operations in response to the TV remote control, select MENU →
 (Setup) → [External Output] → [CTRL FOR HDMI] → [Off].
TP1001273577