Connecting to a power source
Use the Power & Control Cable (supplied) to connect this product to a power supply device such as an AC adaptor.
Connect a DC plug conforming to IEC60130-10 (JEITA standards RC-5320A) TYPE4 to the supplied Power & Control Cable, and use a power supply device with a voltage range of 10.5 V – 13.5 V. We recommend using Sony AC adaptor AC-UES1230MT.
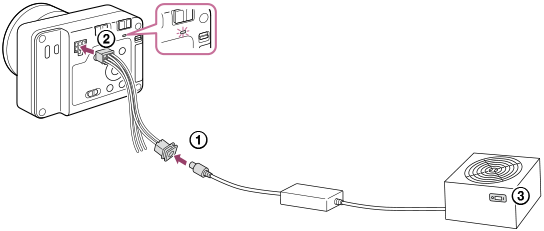
- Connect the Power & Control Cable (supplied) to a power supply device such as an AC adaptor.
- Connect the Power & Control Cable to the Power & Control terminal of the camera.
- Turn on the power supply device.
- Check that the power lamp of the camera is lit to ensure that power is being supplied correctly to the camera.
- The color of the power lamp indicates the power status of the camera.
When lit up in green (start-up state): Power is being supplied, and the ON/OFF (power) switch is turned on
When lit up in red (standby state): Power is being supplied, and the ON/OFF (power) switch is turned off
Hint
-
By connecting individual devices to the FOCUS/TRIGGER/EXPOSURE terminals of the Power & Control terminal, you can send a command to focus the camera (FOCUS) or to release the shutter (TRIGGER) to this product or send a shooting timing signal (EXPOSURE) to the drone.
For the specifications and connection methods of each terminal, refer to “Power & Control terminal specifications.”
Note
- The working voltage range of the available power supply is DC 10 V to 18 V. (This is the guaranteed range for the voltage received by this product (voltage at the receiving end).)
- This product may require approximately 40 W of power momentarily when shooting still images. Use a power supply device with a supply capacity of 40 W or more. In addition, use a power supply device and cable that comply with the laws and regulations of your country or region. If the power supply capacity is 40 W or less, verify operation before use.
- When using a cable other than the supplied Power & Control Cable, confirm that power is supplied and the power lamp lights up in red, then connect the HDMI cable or USB cable, and turn the ON/OFF (power) switch on. If the power lamp does not light up in red, the terminal connection of the cable in use may be incorrect.
- If the power lamp is lit up in red even though the ON/OFF (power) switch is turned on, the following conditions are possible. Check the following settings and the power supply state, etc. as necessary.
- The power off setting was executed by an application developed with the Camera Remote SDK.
- The power save function was activated.
- The input power supply voltage is less than 10 V.
- The input power supply voltage is more than 18 V.
- The temperature of the camera rose, and the power was turned off to protect the product.