


Attaching the receiver to a camera
Attach the receiver to a camera.
Note
-
Before attaching the receiver to a camera, fully charge the receiver.
-
If you connect the receiver to another device using a USB cable while the receiver is attached to the Multi Interface Shoe on a camera, the connection between the camera and receiver via the Multi Interface Shoe will be disconnected.
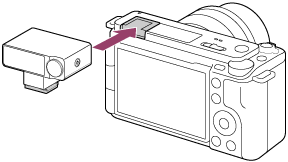
- Align the Multi Interface Shoe adaptor of the receiver with the Multi Interface Shoe on the camera, and then slide the receiver into the Multi Interface Shoe.
Note
-
Be sure to slide the receiver all the way into the Multi Interface Shoe on the camera.
-
If the built-in flash on the camera is raised, push it down.
-
- Check the receiver settings.
From the receiver's control menu screen, select [RX] and check the [MISHOE SET.] setting. Set it to [DIGITAL] or [ANALOG] according to the camera with the receiver attached. The default setting is [DIGITAL]. For details, see “MISHOE SET..”
If the setting is incorrect, a compatibility message is displayed on the camera. For compatible devices, visit the following websites.
To remove the receiver
Slide the receiver in the direction opposite to that for attachment.
Hint
-
You can also connect the receiver's microphone out jack to the camera's microphone input jack using a commercially available 3.5 mm TRS audio cable. In this case, audio is output as an analog signal through the cable.