


Charging the built-in batteries with the charging case
Each of the receiver, the microphone, and the charging case has a built-in lithium-ion rechargeable battery. Connect the charging case and a power source with a commercially available USB Type-C cable to charge the batteries.
- Place the receiver and/or the microphone into the charging case.
The receiver and/or the microphone automatically turns off.
Note
-
Be sure to push in the microphone until it clicks into place. When the microphone is properly placed, its power lamp lights in orange, indicating that battery charging has started.
-
When the charging case battery runs out of power, the receiver and/or the microphone does not turn off automatically.
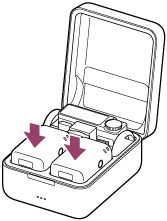
After placing them in the charging case, close the lid.
-
- Connect one end of the USB Type-C cable to the USB Type-C terminal on the back of the charging case.
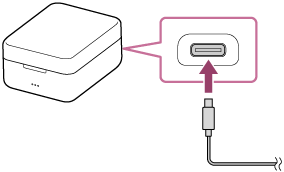
- Connect the other end of the USB Type-C cable to a commercially available USB AC adaptor or other USB power source.
The charging status indicator lamp on the charging case lights in orange, indicating that battery charging has started.
When the charging case battery is fully charged, the charging status indicator lamp turns off.
Hint
-
You can check the charging status of the receiver and/or the microphone by opening the lid of the charging case while charging is in progress. The charging status is displayed on the receiver's system status screen or indicated by the orange power lamp on the microphone. When charging is complete, the power lamp on the microphone turns off.
 (Fully charged) is also displayed on the receiver's screen.
For details, see “Lamp indications” and “System status screen.”
-
The display on the receiver and the power lamp on the microphone turn off 1 minute after you open the charging case lid while charging. To check the charging status, close the charging case lid and then open it. The display on the receiver appears again, allowing you to check the charging status.
-
Normally, the receiver and the microphone turn on automatically when you remove them from the charging case. However, they may not turn on automatically in the following cases:
-
You open the charging case lid while charging and remove the receiver and the microphone, after 1 minute has elapsed and the display on the receiver and the power lamp on the microphone have turned off.
-
You open the charging case lid while charging and remove the receiver before the display on the receiver appears.
-
-
About the battery charging time
By placing the receiver and/or the microphone in the charging case and charging the charging case, the receiver, the microphone, and the charging case are charged simultaneously.
Charging the microphone for approximately 5 minutes provides approximately 2 hours*1 of operation.
-
Time required to fully charge the receiver and the microphone: approximately 55 minutes*2 *3
-
Time required to fully charge the charging case alone: approximately 150 minutes*2
*1The operating time is based on the following operating conditions.
- The microphone is connected to the receiver.
- No external microphone is connected to the audio input jack.
- The input gain is set to 0.
- The LC (Low Cut) filter and NR (Noise Reduction) are off.
- The receiver is set to [2TX] mode, and audio is transmitted at close range without interference.
*2The time required to fully charge the battery from a completely depleted state using a USB AC adaptor with an output of 5 V and 3 A. The charging time may vary depending on the usage conditions.
*3The receiver and the microphone in the charging case are given priority for charging over the charging case itself.
Charging the receiver and/or the microphone while on the go
Charging the charging case in advance allows you to charge the receiver and/or the microphone by placing them in the charging case even when no power source is available while on the go.
The receiver and microphone can each be fully charged approximately once from a completely depleted battery state.
Notes on charging the receiver and/or the microphone while on the go
-
When the charging case battery is depleted, placing the receiver and/or the microphone into the charging case does not automatically turn them off.
-
When you open or close the lid of the charging case, or remove the receiver and/or the microphone from the charging case, the charging status indicator lamp (orange) lights up or flashes depending on the remaining battery level of the charging case. If the lamp flashes, the remaining battery level of the charging case is low. Charge the charging case.
Information about the charging case battery
With the receiver placed in the charging case, press and hold the control wheel/button to display the charging case battery information on the receiver's screen.
Hint
-
To charge the battery using a commercially available USB AC adaptor, make sure that the adaptor has a rated output current of 3 A or higher.
Note
-
When the charging case is connected to a USB AC adaptor or a computer, do not apply excessive force to any of them. Doing so may cause damage to the charging case, the USB AC adaptor, or the computer.
-
Connecting the charging case to a laptop computer that is not connected to an AC power outlet may deplete the battery power of the computer. Do not leave the charging case connected for an extended period of time.
-
Use of any customized or hand-built computer is not guaranteed for battery charging or for connection to this unit. Depending on the USB devices used simultaneously, proper operation may not be possible.
-
This unit is not guaranteed to operate with all USB AC adaptors and computers.
-
When you are charging this unit using a computer, charging stops if the computer enters standby (sleep) or hibernate mode. In this case, change the computer settings and charge the unit again.
-
If this unit has not been used for an extended period of time, the battery life may be shorter. After repeating charging and discharging several times, the battery can be charged sufficiently. When storing the unit for an extended period of time, charge it approximately once every six months to prevent over-discharge.
-
If this unit has not been used for an extended period of time, charging may take longer.
-
If a problem occurs with any of the batteries of this unit and an abnormality is detected during charging, the three charging indicator lamps (orange) on the charging case continue to flash.
We recommend charging the unit when the ambient temperature is between 10 °C and 30 °C (50 °F and 86 °F). Efficient charging may not be possible outside this temperature range.
If the issue persists, consult your nearest Sony dealer.
-
When you charge this unit after it has not been used for an extended period of time, the charging status indicator lamp (orange) on the charging case may not light up immediately. Wait until the charging status indicator lamp lights up.
-
If the battery life becomes extremely short, it is time to replace the battery. Consult your nearest Sony dealer.
-
Avoid exposing this unit to rapid changes in temperature, direct sunlight, fog, sand, dust, and electrical shocks. Never leave the unit in a parked vehicle.
-
When connecting the charging case to a computer, be sure to use only a USB Type-C cable and connect it directly. Connecting via a USB hub or other device may prevent proper charging.