


Locating parts and controls
Receiver
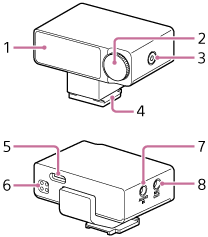
-
Monitor (Touch panel)
-
Control wheel/button
-
ON/OFF (Power) button
-
Multi Interface Shoe adaptor
-
USB Type-C® terminal
Connect this terminal to a power source using a commercially available USB Type-C cable for charging the receiver battery or supplying power to the receiver.
You can also connect the receiver to a USB audio input-compatible device, such as a computer or smartphone, for audio recording.
-
Charging terminal
Use the charging case to charge the receiver.
-
Audio input jack
Connect an external microphone (not supplied) for audio recording. For details, see “Recording audio on a camera using the external microphone connected to the receiver.”
You can also use this terminal to connect a camera's headphone output jack using a commercially available 3.5 mm TRS audio cable to monitor the camera's audio through Bluetooth headphones connected to the receiver.
For details about the settings for monitoring camera audio, see “MONITOR SET..”
-
Microphone out jack
Connect this jack and the microphone in jack on your camera using a commercially available 3.5 mm TRS audio cable for audio recording.
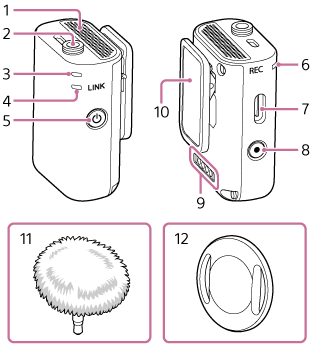
Microphone
-
Internal microphone
-
External microphone jack (monaural)
Connect an external microphone (not supplied) to this jack. The audio input source is automatically switched to the connected external microphone.
-
Power lamp
You can check the power and charging status of the microphone.
When the power lamp continues to flash orange slowly, the battery needs to be charged.
-
LINK lamp
You can check the communication status of the microphone.
-
ON/OFF (Power) button
-
REC lamp
Stays lit while recording to the built-in memory of the microphone is in progress. Flashes when the microphone audio is muted.
-
USB Type-C terminal
Connect this terminal to a power source using a commercially available USB Type-C cable for charging the microphone battery or supplying power to the microphone.
You can also connect the microphone to the USB port on a computer to check the recorded data stored in the microphone's built-in memory on the computer.
-
REC (Recording) button
-
Charging terminal
Use the charging case to charge the receiver.
-
Clip
Use this clip to attach the microphone to your clothing.
-
Wind screen
Attach the wind screen to the microphone to reduce noises caused by breath or strong wind.
-
Magnet
Use this magnet to attach the microphone to your clothing.
Note
- A Bluetooth antenna is built into the microphone near the serial number label on the bottom of the microphone. Holding the microphone in a way that covers this area may affect the wireless communication range.
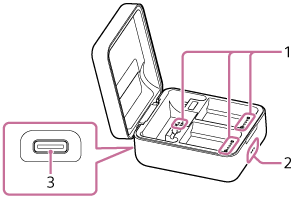
Charging case
-
Charging terminal
-
Charging status indicator lamp
You can check the battery status of the charging case.
You can also check the remaining battery level of the charging case by opening the lid when the charging case is not being charged.
-
USB Type-C terminal
Place the receiver and/or the microphone into the charging case and connect this terminal to a power source using a commercially available USB Type-C cable to charge the batteries of the receiver, microphone, and charging case.
You can also connect the charging case with the microphone inside to the USB port on a computer to check the recorded data stored in the microphone's built-in memory on the computer.
Note
- Do not intentionally push in the charging terminal except when placing the receiver or microphone into the charging case. Doing so may cause a malfunction.