Preparation Step 2: Configuring the initial settings with the “Scent Canvas” app
Advance preparation
- Charge the dedicated tablet to a sufficient level in advance. Check the tablet’s Operating Instructions for the charging method.
- Turn on the dedicated tablet and launch the “Scent Canvas” app.
- Follow the on-screen instructions to select your country/region, check the Software License, and set the language.
When the check finishes, the Home screen is displayed.
- Tap
 (Settings) in the upper right part of the “Scent Canvas” app Home screen followed by the [Admin Mode]
  (On/Off) switch to turn Administrator Mode on.
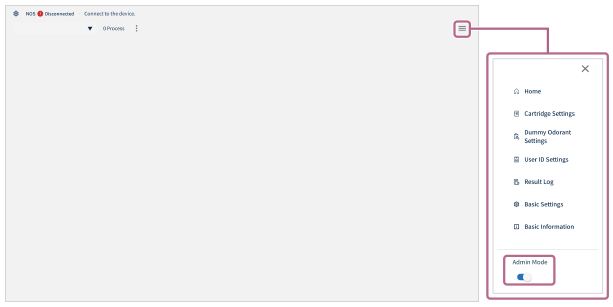
- Tap (Settings) in the upper right part of the Home screen and then tap [
 Cartridge Settings].
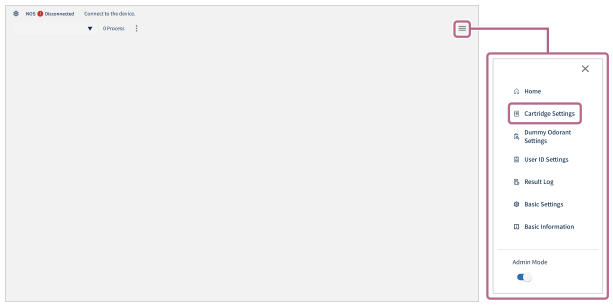
- Tap [
 Add a new setting] in the upper right part of the screen and then tap [Create] on the [Do you want to create a new cartridge setting?] screen.
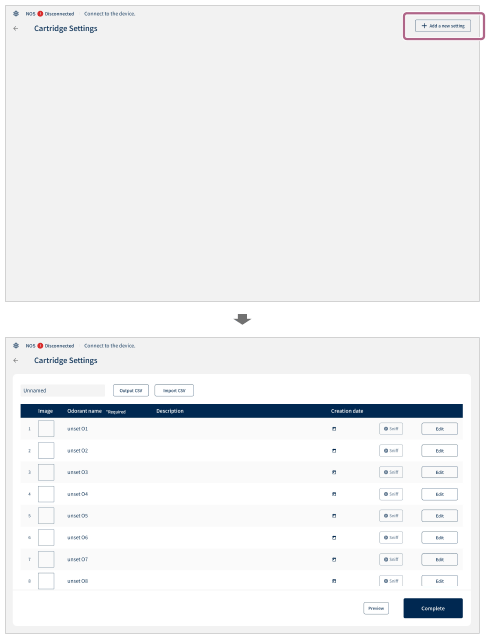
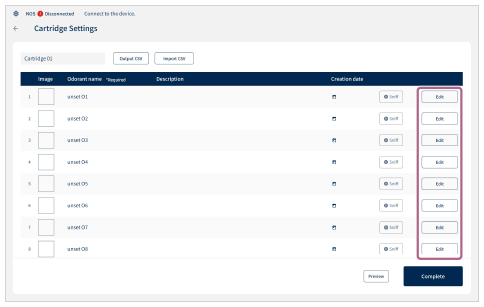
The [Cartridge Settings] screen is displayed.
- Tap [Unnamed] in the upper left part of the screen and enter the cartridge name.
- Tap [Edit] for the number of the sub-cartridge to register an odorant on the [Cartridge Settings] screen.
You can use a CSV-formatted file to batch register the odorant information. For details, see “Batch registering the odorant information” below.
- Enter the odorant information on the [Edit Cartridge] screen.
Enter the [Odorant name]. Enter the thumbnail image, description, and date of odorant injection as needed.
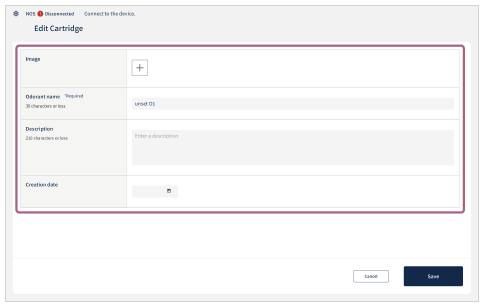
- Image: Save any image to the tablet and set it as the thumbnail image.
- Odorant name (*Required): Register the name of the odorant used for each sub-cartridge number (maximum of 24 characters).
- Description: Enter the description for each odorant (maximum of 210 characters).
- Creation date: Set the date of odorant injection.
- Tap [Save] when the odorant information has been entered.
- Repeat steps 7 through 9 to register the odorants.
Up to 40 different types of odorants can be registered.
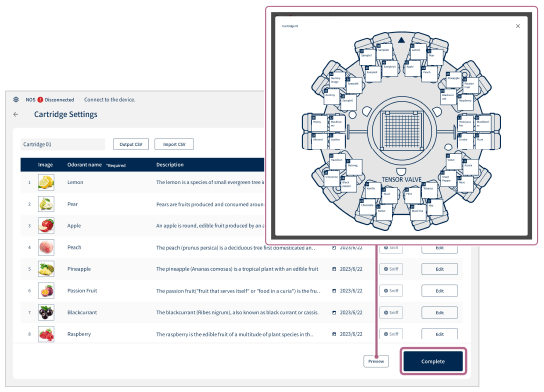
- When all of the odorants have been registered, check the registration details and tap [Complete].
Tap [Preview] to display the cartridge diagram and check the number and position of the sub-cartridges with registered odorants.
Tap [Complete] to save the cartridge settings with the entered details.
Batch registering the odorant information
Tap [Output CSV] (a) to output the CSV file and edit it on a computer.
When the editing is finished, save the CSV file to the tablet, tap [Import CSV] (b), and select the CSV file to load. Follow the on-screen instructions to operate the tablet and tap [Save] to batch register the odorant information.

Perform the operation above when editing registered odorant information.
Hint
If you want to copy and use the same cartridge setting on another tablet, migrate the data to the tablet as follows.
-
Export operation: While displaying the cartridge setting you want to copy, tap [Output CSV]. The CSV file will be saved in the “olfactory_info_yyyymmddhhmmss” folder. If images are registered in the cartridge setting, the image data will also be saved in the “pictures” folder.
Copy the entire “olfactory_info_yyyymmddhhmmss” folder to the tablet to which you want to migrate the data.
- Import operation: On the tablet to which you want to migrate the data, tap [Import CSV] on the [Cartridge Settings] screen. Then, select and import the CSV file in the “olfactory_info_yyyymmddhhmmss” folder that you have copied. If there are images in the folder, they will be imported simultaneously.
Note
- According to the CSV (Comma Separated Values) specifications, the comma (“,”) character cannot be used. If a comma (“,”) is entered, the “Scent Canvas” app will not correctly load the CSV file.
- If the information is overwritten during registration, the previously registered information is erased.