Remote control (upper section)
Use the supplied remote control to operate this receiver.
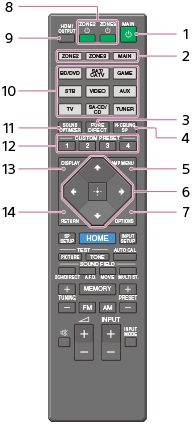
- MAIN
 (power)
Turns the receiver on or sets it to the standby mode.
Saving power in standby mode
Save power by setting the receiver as follows:
- Set [Control for HDMI], [Standby Through], [Audio Return Channel], [Network Standby], [Zone2 Power] and [Zone3 Power] to [Off].
- ZONE2, ZONE3, MAIN
Selects the place where you will control.
- PURE DIRECT
Press to use the Pure Direct function.
- IN-CEILING SP
Activates the In-Ceiling Speaker Mode.
- AMP MENU
Displays the menu on the display panel of the receiver to operate the receiver.
-
 ,
,  /
/ /
/ /
/
Press
/// to select the menu items.Then press
to enter the selection. - OPTIONS
Displays the options menus on the TV screen for item selection.
- ZONE2
(power),
ZONE3
(power)
Turns the receiver in Zone 2 or Zone 3 on or sets it to the standby mode.
- HDMI OUTPUT
Switches the output for two monitors connected to the HDMI OUT A and HDMI OUT B (ZONE 2) jacks.
- Input buttons
Select the device you want to use.
When you press any of the input buttons, the receiver turns on.
- SOUND OPTIMIZER
Press to use the Sound Optimizer function to enjoy clear and dynamic sound at low volume levels.
- CUSTOM PRESET (1, 2, 3, 4)
Saves and recalls various settings for the receiver.
- DISPLAY
Displays information on the TV screen.
- RETURN
Returns to the previous menu.
Note
- The above explanations are intended to serve as examples.