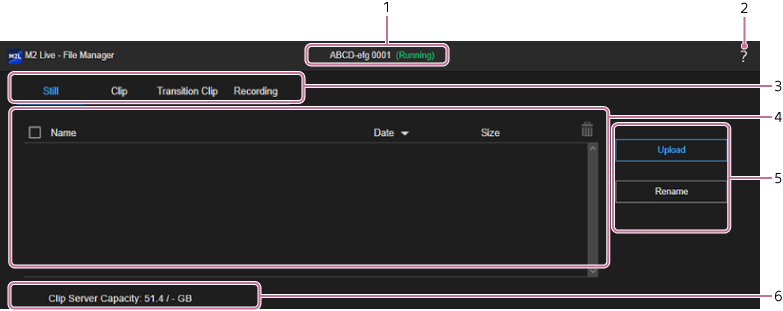
Structure of the [File Manager] Screen
[Still] tab
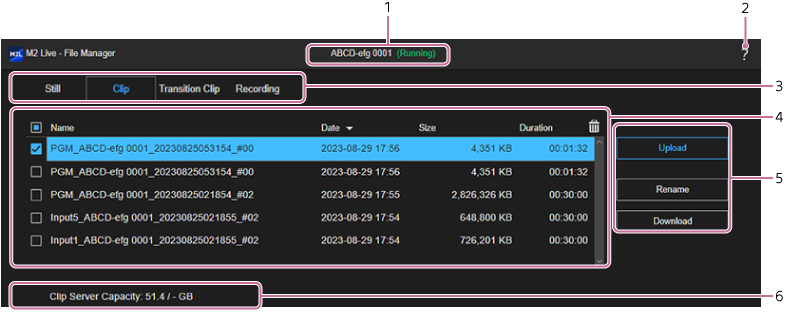
[Clip] tab
[Transition Clip] tab
![]()
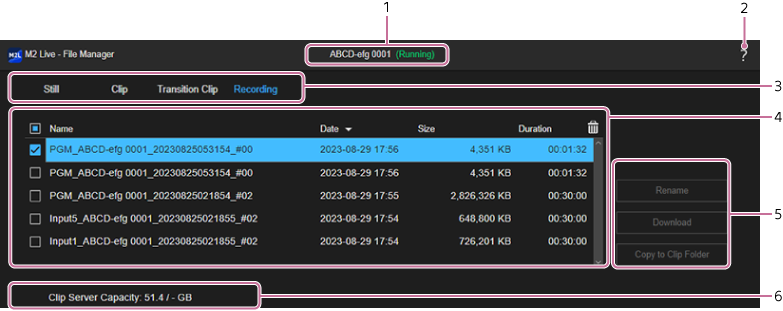
[Recording] tab
- Event name/status display: Displays the name/status of the event for which the [File Manager] screen was opened.
-
 (Help Guide): Select to display this Help Guide.
 -
Content type tabs: Press a tab to switch the file list display contents.
- [Still]: Displays a list of uploaded images for the event.
- [Clip]: Displays a list of uploaded video clips for the event and files which were copied using [Copy to Clip Folder] on the [Recording] tab.
- [Transition Clip]: Displays a list of animations for transitions for the event.
- [Recording]: Displays a list of recorded output and input content files.
Hint
- To play a recorded video file using a clip player, it must be displayed in the list on the [Clip] tab. Select a video file on the [Recording] tab and execute [Copy to Clip Folder] to copy the video file to the [Clip] tab.
- Files up to a total capacity of 100 GB on the [Still] tab, [Clip] tab, and [Transition Clip] tab can be used in a single event.
-
File list: Displays a list of files (video clips or still images) corresponding to each tab.
Hint
- Files that are currently recording the output and input content are not displayed. Only files for which recording has finished are displayed.
- Checkbox: Place a check mark in the checkbox for files you want to delete or copy to the [Clip] tab ([Recording] tab only). You can press the checkbox at the top of the list to add or clear the check marks for all files in the list.
- [Name]: Displays the name of each file. You can press the [Name] label at the top of the list to change the sort order alphabetically. Each press changes the sort order between ascending and descending.
- [Date]: Displays the upload date and time of each file. You can press the [Date] label at the top of the list to change the sort order by the upload date and time. Each press changes the sort order between ascending and descending.
- [Size]: Displays the file size of each file. You can press the [Size] label at the top of the list to change the sort order by the file size. Each press changes the sort order between ascending and descending.
-
[Duration]: Displays the length of each file. You can press the [Duration] label at the top of the list to change the sort order by the length. Each press changes the sort order between ascending and descending.
Note
- This field may be blank for video clips that were uploaded in prior versions.
- [Unknown] is displayed if information about the file cannot be obtained due to file corruption or other reason.
-
 (Delete): Use to remove the files selected in the list.
-
Operation buttons: Buttons for performing operations on files.
- [Upload] button: Use to upload files.
- [Rename] button: Use to rename the selected file in the list.
- [Download] button: Use to download the files selected in the list.
- [Copy to Clip Folder] button: Use to copy the files selected in the list to the [Clip] tab.
- [Clip Server Capacity]: Displays the used storage capacity in an event and available storage capacity.
-
[Upload Option]: Set the frame rate during playback of animations for transitions using [Frame Rate]. This setting is applied when uploading animations for transitions.
Note
- The frame rate of animations for transitions that have already been uploaded is not changed if the [Frame Rate] setting is subsequently changed.