Structure of the [Live Operation] Screen
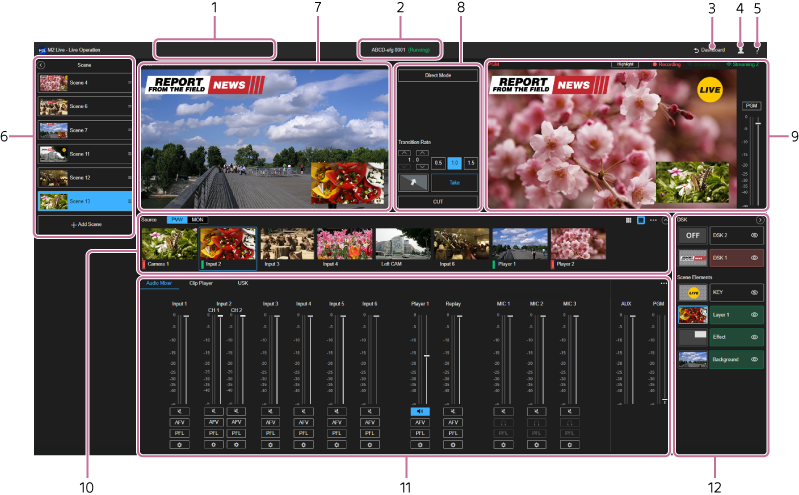
- Event name/status display: Displays the name/status of the event for which the [Live Operation] screen was opened.
- [Dashboard] button: Use to return to the [Dashboard] screen after finishing live operation.
-
 (Account): Press the icon to display a drop-down list.
- [Preferences]: Use to change the operation method of this service. The following sub-items are available:
- [Shortcut Keys]: Press to display the [Shortcut Keys] screen in a separate tab. Use to configure shortcut keys for use with this service.
- [Accessibility Mode]: Press to enable/disable accessibility mode.
When accessibility mode is enabled, you can move items by pressing the directional keys displayed for each item when sorting items in a list on the [Live Operation] screen.
When accessibility mode is disabled, you can move items using drag & drop.
- [Privacy Policy]: Displays the user agreement and privacy policy.
- [Sign Out]: Select to sign out from this service.
- [Preferences]: Use to change the operation method of this service. The following sub-items are available:
-
 (Help Guide): Select to display this Help Guide.
 -
[Scene] pane: Displays a list of registered scenes. Press
 (Close) to close the [Scene] pane. To open the [Scene] pane, press the [Scene] bar on the left edge of the screen.
Hint
- The [Scene] pane open/close status is stored for each user. This does not affect other users using the same event.
-
[PVW] pane: Displays the preview output video (the video that will be the next program output). Also used to check the image assigned to USK/KEY, and the size and position of a PinP subscreen, among other things.
When [MON] is selected in the pull-down list on the top left, only the video selected in the [Source] pane can be monitored.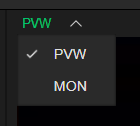
Hint
- The [PVW] and [MON] selection status is stored for each user. This does not affect other users using the same event.
- Transition control pane: Displays buttons and settings for configuring and performing transitions.
-
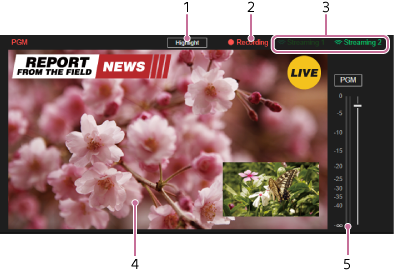
[PGM] pane: Displays the program output video and status of the audio and output. When [Direct Mode] is enabled, a red frame is displayed around the video area.
-
[Recording] status indicator: Displays the recording status.
-
 (Recording): Displayed when recording.
 -
 (Stopped): Displayed when not recording.
 -
 (Recording error): Displayed when an error occurs during recording.
 -
 (Error stop): Displayed when an error occurs and recording has stopped.
-
-
[Streaming 1]/[Streaming 2] status indicator: Displays the streaming output status.
-
 (Streaming output): Displayed when streaming output is in progress.
 -
 (Stopped): Displayed when streaming output is not in progress.
 -
 (Streaming output error): Displayed when an error occurs during streaming output.
 -
 (Error stop): Displayed when an error occurs and streaming output has stopped.
-
- Video display pane: Displays the program output video.
- Audio adjustment pane: Use to adjust the volume and monitor the audio level of the output audio. Each time you press the [PGM]/[AUX] button, the monitor target switches between the program output and AUX output. Also, while a [PFL] button is held pressed on the [Audio Mixer] tab on the Edit/Control pane, only the audio for the channel for which the [PFL] button is pressed becomes the monitor target.
-
[Recording] status indicator: Displays the recording status.
-
[Source] pane:

- Mode selection button:You can switch to private video monitoring by pressing [MON]. This does not affect other users even when selecting video on the [Source] pane.
-
Thumbnail view: Displays the input source [Display Name] setting and video configured on the [Input] tab of the [System Settings] screen. You can assign an uploaded or recorded video file to [Player 1] and [Player 2]. If the instant replay function is enabled, [Player 2] is replaced by [Replay], which is used for the instant replay function.
A blue frame is displayed around the selected video.
A tally is lit for the current program output and current preview output video.
The tally is lit red during program output and lit green during preview output. -
 (Large)/
 (Small)
: Changes the display size of the thumbnails.
(Small)
: Changes the display size of the thumbnails. -
 (Options)
:
(Options)
:- [Buffer Settings]: Displays a dialog for adjusting the buffer for each input content.
-
 (Increase display area)/
 (Decrease display area)
: Changes the size of the display area of the [Source] pane. Increasing the size of the display area of the [Source] pane decreases the size of the display area in the [PVW] pane and [PGM] pane, with part of the [PGM] pane and transition control pane hidden.
(Decrease display area)
: Changes the size of the display area of the [Source] pane. Increasing the size of the display area of the [Source] pane decreases the size of the display area in the [PVW] pane and [PGM] pane, with part of the [PGM] pane and transition control pane hidden.
Hint
- The sizes of thumbnails and the size of the display area in the [Source] pane are stored for each user. This does not affect other users using the same event.
Note
- If there is a problem with the input video, such as image freezing, you can check whether an error has been output using [Status] on the [System Settings] screen or using the [Streaming Monitor] screen.
- Edit/Control pane: Displays the setup items for assigning content and editing settings. The display content will vary depending on the selection status of the [Source] pane and [Layer] pane.
-
[Layer] pane: Displays the layers of each content composited in the video.
Press (Close) to close the [Layer] pane. To open the [Layer] pane, press the [Layer] bar on the right edge of the screen.You can press the thumbnail area of a layer to assign content and edit settings. You can also press the name of a layer to switch the output status.
Hint
- The [Layer] pane open/close status is stored for each user. This does not affect other users using the same event.
The background color and icon vary depending on the output status.- Gray: The layer is not being output anywhere.
 (No output) is displayed to indicate that the layer is not being output.
 - Red: The layer is active and is being used in the program output video.
 (Output) is displayed to indicate that the layer is being output.
 - Green: The layer is active and is being used in the preview output video. (Output) is displayed to indicate that the layer is being output.