Shooting movies
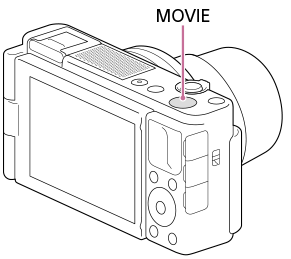
You can record movies by pressing the MOVIE (Movie) button.
- Press the MOVIE button to start recording.
- Since the [MOVIE Button] is set to [Always] in the default setting, movie recording can be started from any shooting mode.

- Press the MOVIE button again to stop recording.
Hint
- You can assign the start/stop movie recording function to a preferred key. MENU →
 (Camera Settings2) → [
 Custom Key] → set [MOVIE] to the preferred key.
 - When you want to specify the area to be focused on, set the area using [Focus Area].
- To keep the focus on a face, arrange the composition so that the focusing frame and face detection frame overlap, or set the [Focus Area] to [Wide].
- To adjust the shutter speed and aperture value to the desired settings, set the shooting mode to
 (Movie) and select the desired exposure mode.
 - An icon indicating that data is being written is displayed after shooting. Do not remove the memory card while the icon is displayed.
- The following settings for still image shooting are applied to the movie shooting:
- White Balance
- Creative Style
- Metering Mode
- Face/Eye Priority in AF
- Face Priority in Multi Metering
- D-Range Optimizer
- You can change the settings for ISO sensitivity, exposure compensation, and focus area while shooting movies.
- While shooting movies, the recorded image can be output without the shooting information display by setting [HDMI Info. Display] to [Off].
Note
- The sound of the lens and the product in operation may be recorded during movie recording. The sound of the zoom is particularly likely to be recorded during movie recording if [Zoom Speed] is set to [Fast].
You can set the camera not to record sound by selecting MENU → (Camera Settings2) → [Audio Recording] → [Off].
 - The recording lamp lights up when recording starts.
- The temperature of the camera tends to rise when shooting movies continuously, and you may feel that the camera is warm. This is not a malfunction. Also, [Internal temp. high. Allow it to cool.] may appear. In such cases, turn the power off and cool the camera and wait until the camera is ready to shoot again.
- If
 (Overheating warning icon) appears, the temperature of the camera has risen. Turn the power off and cool the camera and wait until the camera is ready to shoot again.
 - For the continuous shooting time of a movie recording, refer to “Recordable movie times.” When movie recording is finished, you can record another movie by pressing the MOVIE button again. Recording may stop to protect the product, depending on the temperature of the product or the battery.
- When the shooting mode is set to
 (Movie),
  (
( Intelligent Auto) or
  (High Frame Rate), or during movie shooting, you cannot select [Tracking] for [Focus Area].
 - In [Program Auto] mode when shooting movies, the aperture value and the shutter speed will be set automatically and cannot be changed. For that reason, the shutter speed may become fast in a bright environment, and the motion of the subject may not be recorded smoothly. By changing the exposure mode and adjusting the aperture value and the shutter speed, the motion of the subject can be recorded smoothly.
- In movie shooting mode, ISO sensitivity can be selected from ISO 125 to ISO 12800. If the ISO value is set to a value smaller than ISO 125, the setting is automatically switched to ISO 125. When you finish recording the movie, the ISO value returns to the original setting.
- When ISO sensitivity is set to [Multi Frame NR], [ISO AUTO] will be set temporarily.
- In movie shooting mode, the following settings cannot be set in [Picture Effect]. When a movie recording starts, [Off] will be set temporarily.
- Soft Focus
- HDR Painting
- Rich-tone Mono.
- Miniature
- Watercolor
- Illustration
- The Face Detection function / Eye Detection function is not available in the following situations.
- [
 File Format] is set to [XAVC S 4K], [
 Record Setting] is set to [30p 100M]/[25p 100M] or [30p 60M]/[25p 60M], and [
 4K Output Select] is set to [Memory Card+HDMI]
 - [
 File Format] is set to [XAVC S HD], and [
 Record Setting] is set to [120p 100M]/[100p 100M] or [120p 60M]/[100p 60M]
- [
- If you point the camera at an extremely strong light source while shooting a movie at low ISO sensitivity, the highlighted area in the image may be recorded as a black area.
- Use PlayMemories Home when importing XAVC S movies and AVCHD movies to a computer.

