Using a Battery Pack
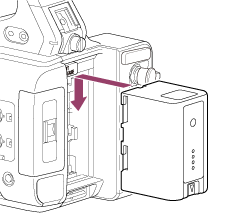
Attaching the battery pack
Plug the battery pack into the attachment as far as it will go, and then slide it down to lock it into position.
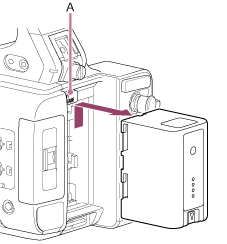
Removing the battery pack
Press and hold the BATT RELEASE button (A), slide the battery pack up, and then pull it out of the attachment.
Note
- Before attaching a battery pack, charge the battery using the dedicated BC-U1A/BC-U2A battery charger.
- Charging a battery pack while it is warm (for example, immediately after use) may not fully recharge the battery.
Checking the remaining capacity
When shooting/playing using a battery pack, the remaining battery capacity is displayed on the LCD monitor.
| Icon | Meaning |
|---|---|
|
|
91% to 100% |
|
|
71% to 90% |
|
|
51% to 70% |
|
|
31% to 50% |
|
|
11% to 30% |
|
|
0% to 10% |
The unit indicates the remaining capacity by calculating the available time with the battery pack if operation is continued at the current rate of power consumption.
If the battery pack charge becomes low
If the remaining battery charge falls below a certain level during operation ([Low Battery] state), a low-battery message appears and the recording/tally lamp starts flashing to warn you.
If the remaining battery charge falls below the level at which operation cannot continue ([Battery Empty] state), a battery-empty message appears.
Replace with a charged battery pack.
Changing the warning levels
The [Low Battery] level is set to 10% of full battery charge and the [Battery Empty] level is set to 3% by factory default. You can change the warning level settings using [Technical] – [Camera Battery Alarm] in the full menu.