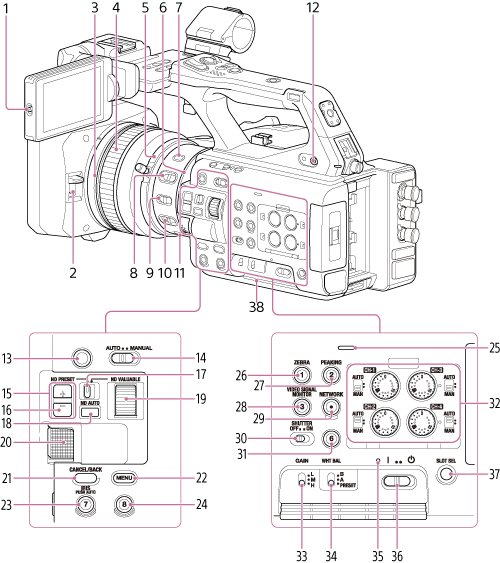
Right Side
-
L/R / ROTATE switch
Sets the LCD monitor display.
-
Lens hood shutter open/close switch
-
Full MF switch
Switch on/off by moving the focus ring forward/backward.
For details, see “Adjusting the Focus Manually.”
-
Focus ring
-
Zoom ring
SERVO/MANUAL switching is controlled using the zoom servo switch on the bottom side.
Note
- After setting the power switch to the on position, do not move the lens until the initialization operation is finished. Doing so will cause focus to be lost.
-
IRIS ring
Adjusts the iris value in IRIS manual mode.
-
STEADY SHOT button
-
IRIS switch
Switches the iris adjustment mode.
Note
- Set to AUTO when using a remote controller.
-
MACRO switch
Switches the macro shooting mode.
-
FOCUS switch
Switches between auto focus mode and manual focus mode.
-
FOCUS PUSH AUTO button
In manual focus mode: Activates auto focus mode while the button is pressed.
In auto focus mode: Activates manual focus mode while the button is pressed.
-
Headphone jack
-
ASSIGN (assignable) 11 button
When the screen magnifier function is enabled, the function is assigned to this button. For details, see “Magnifying the LCD Monitor Screen Display.”
-
AUTO/MANUAL switch
Switches between FULL AUTO mode and MANUAL shooting mode.
-
ND FILTER POSITION up/down buttons
-
ND CLEAR indicator
Lit when the ND filter is in the CLEAR position.
-
ND switch
Switches the ND filter adjustment mode. Preset mode in the left position, and variable mode in the right position.
-
ND AUTO button/lamp
Sets ND auto mode. Enabled in ND variable mode only.
-
ND VARIABLE dial
Adjusts the ND filter density in ND variable mode.
-
Multi-function dial
Press when viewing the image on the LCD monitor to display the direct menu.
Turn the dial when a menu is displayed on the LCD monitor to move the cursor up/down to select menu items or settings. Press to apply the selected item.
When the menu is not being displayed, the dial functions as an assignable dial.
-
CANCEL/BACK button
Press to return to the previous menu. Any unconfirmed changes are canceled.
-
MENU button
Press and release to display the status screen. Press and hold to display the full menu screen.
-
IRIS PUSH AUTO / ASSIGN (assignable) 7 button
-
ASSIGN (assignable) 8 button
-
Built-in speaker
-
ZEBRA / ASSIGN (assignable) 1 button
-
PEAKING / ASSIGN (assignable) 2 button
-
VIDEO SIGNAL MONITOR / ASSIGN (assignable) 3 button
-
NETWORK button/lamp
The lamp is lit when the network connection is operating normally. If the lamp is flashing, press the NETWORK button to check the status on the [Network] status screen.
For details, see “Checking the Network Connection Status.”
-
SHUTTER switch
Turns the electronic shutter on/off.
-
ASSIGN (assignable) 6 button
-
Audio adjustment switch
- AUTO/MAN switch
Switches the CH-1/CH-2/CH-3/CH-4 audio recording level between auto mode and manual mode. - AUDIO LEVEL (CH-1/CH-2/CH-3/CH-4) dial
Adjusts the CH-1/CH-2/CH-3/CH-4 audio recording level manually in manual mode.
- AUTO/MAN switch
-
GAIN switch
Switches the gain value of the video amplifier. The gain values corresponding to each switch position can be configured on the [Camera] status screen or using the full menu.
-
WHT BAL (white balance memory select) switch
Switches the white balance adjustment mode.
-
Power lamp
-
Power switch
-
SLOT SELECT button
When two memory cards are inserted, press the SLOT SELECT button to switch between memory card slots.
-
Air inlet
Note
- Do not cover the air inlet.