Solid-State Memory Camcorder
PXW-Z300/PXW-Z380
Help Guide
Table of Contents
Top
Read This First
How to Use This Help Guide
Usage Precautions
Name of Parts
System Configuration
Left Side/Front Side
Right Side
Rear Side/Connector Block/Card Slots
Top Side/Handle
Bottom Side
Using the Touch Panel
Screen Display
Status Screen
Preparation
Power Supply
Using a Battery Pack
Using a USB Charger
Switching the Power On/Off
Basic Configuration
Date and Time
Accessibility Functions
Configuring Basic Operation
Shooting Mode
Recording Format
Attaching Devices
Attaching a Microphone (sold separately)
Attaching the LCD Hood (supplied)
Attaching the Lens Hood (supplied)
Adjusting the LCD Monitor
Adjusting the Angle and Position of the LCD Monitor
Adjusting the Brightness of the LCD Monitor
Magnifying the LCD Monitor Screen Display
Using Memory Cards
Memory Cards
Recommended Memory Cards
Inserting a Memory Card
Ejecting a Memory Card
Initializing Memory Cards
Checking the Remaining Recording Time
Shooting
Basic Operation Procedure
Adjusting the Zoom
Zooming using the Zoom Lever
Using the Digital Extender
Zooming using the Handle Zoom Lever
Zooming using the Zoom Ring
Adjusting the Focus
Adjusting the Focus Manually
Focusing using Touch Operation
Using Auto Focus Temporarily
Focusing using Magnified View
Adjusting the Focus Automatically
Setting the Auto Focus Area/Position
Changing the Focus Area Quickly
Moving the Focus Area Frame using Touch Operation
Using Manual Focus Temporarily
Tracking using Human Detection
Tracking a Specified Subject
Starting Realtime Tracking AF
Stopping Realtime Tracking AF
Notes on Shooting
Adjusting the Flange Focal Distance
Adjusting the Brightness
Adjusting the Iris
Adjusting the Gain
Adjusting the Shutter
Adjusting the Light Level
Adjusting the White Balance
Adjusting the White Balance Automatically
Adjusting the White Balance Manually
Configuring Image Stabilization
Using Image Stabilization
Configuring Audio
Setting the Audio to Record
Selecting the Audio Input Device
Adjusting the Audio Recording Level Automatically
Adjusting the Audio Recording Level Manually
Using Shooting Functions
Direct Menu
Assignable Buttons
Assignable Dial
Multi-Function Dial
Slow & Quick Motion
Recording Video Intermittently (Interval Rec)
Recording Cached Pictures (Picture Cache Rec)
Recording Continuously as a Single Clip (Clip Continuous Recording)
Recording to Both Memory Cards A and B
Recording 4K Video and HD Video Simultaneously
Auto Framing
Manual Framing
Video Signal Monitor
Gamma Display Assist Function
Clip Flags
Setting the Clock Automatically
Recording Location Data
Proxy Recording
Proxy Recording
Recording and Uploading a Proxy Clip in Chunks
Shooting with the Desired Look
Selecting a Look
Importing a Desired Base Look
Deleting a Base Look
Customizing a Look
Storing a Look as a Scene File
Renaming a Scene File
Sharing the Look with Another Camera
Saving a Scene File from Internal Memory to a Memory Card
Loading a Scene File Saved on a Memory Card into Internal Memory
Connecting to a Network
Network Functions
Using “Monitor & Control”
Connecting with “Monitor & Control”
Connecting to the Internet
Connecting to the Internet via Wireless LAN
Connecting to the Internet via USB Tethering
Connecting to the Internet via Wired LAN
Checking the Network Connection Status
Using Creators' App for Enterprise
Transferring Files to “C3 Portal” and “Ci Media Cloud”
Transferring Files
Preparing to Transfer Files
Selecting and Transferring a Clip
Transferring Clips Automatically
Transferring using Secure FTP
Streaming
Playback
Structure of the Thumbnail Screen
Playing a Clip
Clip Operations
Changing Settings
Menu List
Full Menu Operations
Entering a Character String
Locking the Menu
Unlocking the Menu
Magnifying the Screen Display
Configuring Full Menu Functions
[
User
] Menu
[
Edit User Menu
] Menu
[
Shooting
] Menu
[
Project
] Menu
[
Paint/Look
] Menu
[
TC/Media
] Menu
[
Monitoring
] Menu
[
Audio
] Menu
[
Thumbnail
] Menu
[
Technical
] Menu
[
Network
] Menu
[
Maintenance
] Menu
[
Video Format
] / [
Quality
] / [
Bit Rate
] Settings
Image Quality Settings Saved for Each Shooting Mode
Saving a Configuration File
Using External Devices
Using a Monitor and Recording Devices
Preparing to Connect an External Monitor/Recorder
Connecting an External Device to the SDI Output
Connecting an External Device to the HDMI Output
Synchronizing the Phase of the Video Signals (Genlock)
Using a Remote Controller
Using a Mobile Device or LANC Remote Control
Using a Grip Remote Control
Using a Bluetooth Remote Control
Using a Computer
Streaming the Camera Video to a Computer via USB
Managing/Editing Clips using a Computer
Output Formats
SDI/HDMI Output Connector Output Formats
Appendix
Troubleshooting
Error/Warning Messages
Items Saved in Files
Block Diagrams
Licenses
Specifications
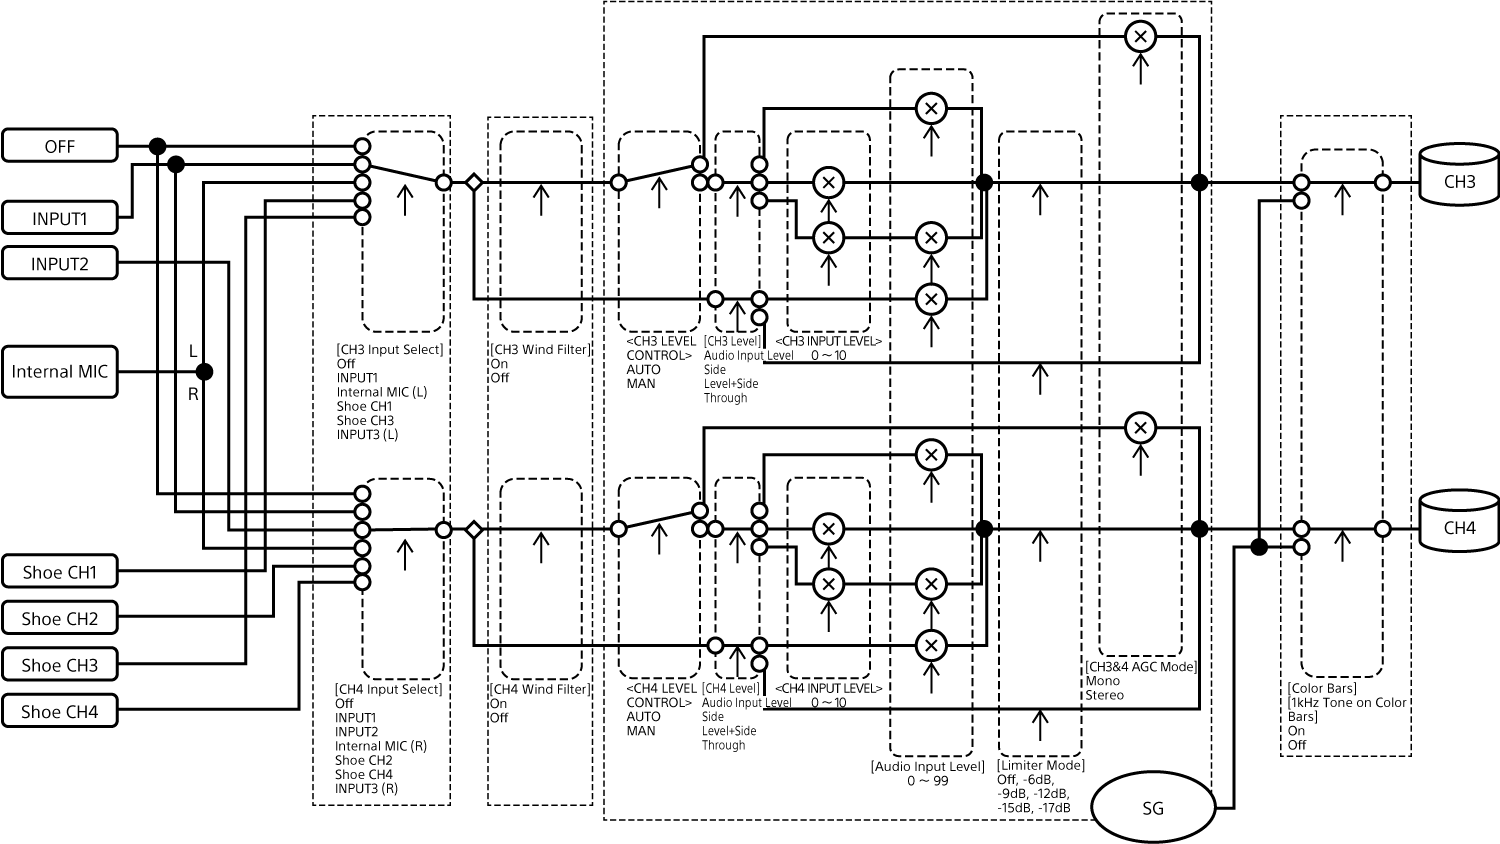
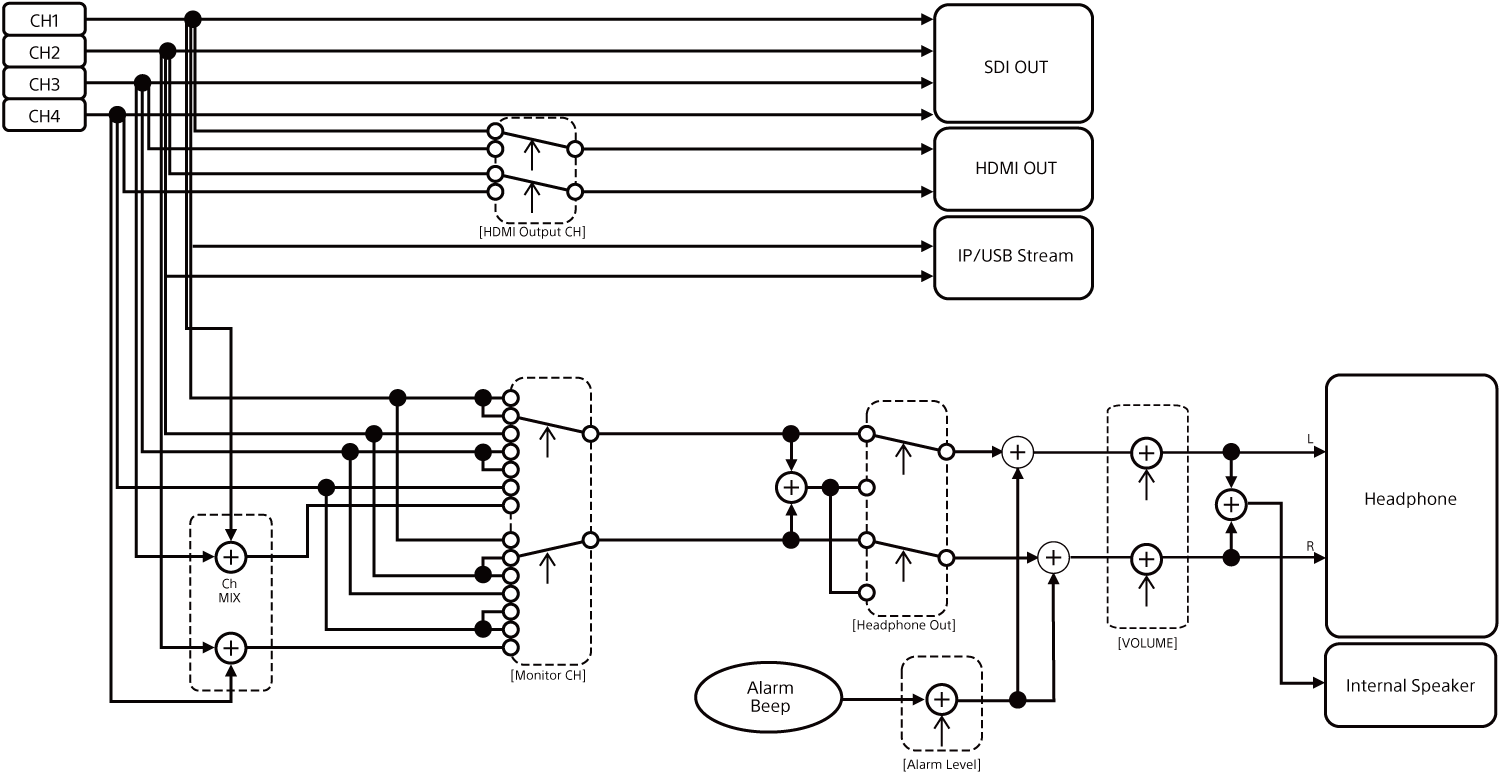
Block Diagrams
The block diagrams are related to audio and the [
Audio
] menu.
[
Audio Input
] (CH1&CH2)
[
Audio Input
] (CH3&CH4)
[
Audio Output
]
Print This Page
Previous
Next
TP1002071055