Connecting to the Internet via Wireless LAN
Connect the unit to an existing wireless LAN access point. Connect the mobile device to control operation via the access point.
The 10 most recently connected access points are displayed in the history. The connection history is saved in an All file, but the access point passwords are not saved. Password entry is required the next time you connect after loading an All file.
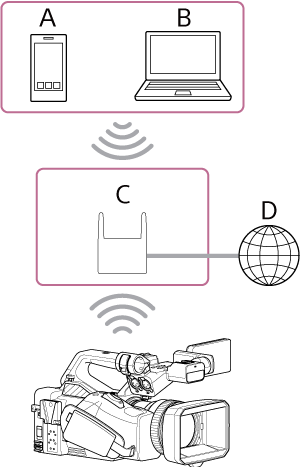
A: Smartphone/tablet
B: Computer
C: Access point
D: Internet
Hint
- When connected to an access point, the unit operates in station (ST) mode.
- You may be able to configure your mobile device as an access point (Wi-Fi tethering). For details, refer to the operation manual for the mobile device.
Connecting using the access point auto detection function
-
Press the NETWORK button.
The [Network] status screen appears.
Hint
- You can also press the MENU button and scroll the screen to display the status.
-
Set [Wireless LAN] – [Setting] to [Wireless LAN ST].
Note
- The unit does not support simultaneous use of wireless LAN and wired LAN.
- The unit is not a network device (for example, a router or switching hub). It is strongly recommended that you connect the unit to a network where you can configure and manage the network settings appropriately to protect against network-based attacks, such as DoS attacks (Denial of Service attacks).
- When connecting the unit to a network, connect it via a router that is configured and managed appropriately, or connect it to a LAN port that has the same functionality. If connected without such protection (for example when using free Wi-Fi), security issues may occur. When properly configured, routers provide sufficient protection against DoS attacks or loss of functionality of devices in the network. If you notice anything unusual, immediately disconnect the camera from the network.
-
Press [Wireless LAN] – [Status].
The [Scan Networks] screen appears.
- Select the access point for the network to which you want to connect and enter the password.
-
Configure the following connection settings, as required.
Configuration item Description [DHCP] Set the DHCP setting.
When set to [On], the IP address is assigned to the unit automatically. To assign an IP address to the unit manually, set to [Off].[IP Address] Enter the IP address of the unit.
This setting is available only when [DHCP] is set to [Off].[Subnet Mask] Enter the subnet mask of the unit.
This setting is available only when [DHCP] is set to [Off].[Gateway] Enter the gateway for the access point.
This setting is available only when [DHCP] is set to [Off].[DNS Auto] Set whether to acquire DNS automatically. When set to [On], the DNS server address is automatically acquired.
This setting is available only when [DHCP] is set to [On].[Primary DNS Server] Enter the primary DNS server for the access point.
This setting is available only when [DNS Auto] is set to [Off].[Secondary DNS Server] Enter the secondary DNS server for the access point.
This setting is available only when [DNS Auto] is set to [Off]. -
When finished, press the [Connect] button.
The unit connects to the Internet.
Hint
- To use “Monitor & Control” or the “Camera Remote SDK” to control the unit from an external device, set [Wireless LAN] – [Remote] to [Enable] on the [Network] status screen.
- Press the [Show Authentication] button on the [Network] status screen to display the authentication information for connecting to the unit. Take care that the screen cannot be viewed and the QR code image cannot be copied by others.
Connecting manually by entering access point information
- Set [Wireless LAN] – [Setting] to [Wireless LAN ST] on the [Network] status screen.
-
Configure [Network] – [Wireless LAN] – [Manual Register] in the full menu.
The [Wireless LAN] – [Manual Register] screen appears.
-
Configure the following settings.
Configuration item Description [SSID] Enter the SSID for the wireless LAN access point.
Note
- Enter 1 to 32 valid input characters. The following are valid input characters.
Alphabetic characters (uppercase and lowercase), numeric characters, symbols (- . @ _ ( ) ! " # $ % & ' * + , / : ; < = > ? [ \ ] ^ ` { | } ~)
[Security] Select the encryption method.
Note
- In this topic, wireless LAN access points and wireless LAN routers that relay LAN connections are referred to as “access points.”
- The unit supports connections to access points with WPA3-SAE, WPA2-PSK (AES), or no security settings. For secure wireless LAN connection, connection to access points with WPA3 or WPA2 security setting is strongly recommended.
- By default, the WPA2 security method is selected.
- If you connect to an access point without any security setting, you may be subject to hacking, access by malicious third parties, or attacks upon vulnerabilities. Unless it is otherwise unavoidable, connection without any security setting is not recommended.
- Configuring security on a wireless LAN is very important. Sony will not be liable for any damages resulting from security measures not being taken, or if a security problem occurs due to unavoidable circumstances in the use of wireless LAN.
[Password] Enter the password for the wireless LAN access point.
Note
- The following shows the number of valid input characters.
- When set to [WPA2]: 8 to 63 characters
- When set to [WPA3]: 8 to 128 characters
- When set to [None]: 0 characters
Alphabetic characters (uppercase and lowercase), numeric characters, symbols (- . @ _ ( ) ! " # $ % & ' * + , / : ; < = > ? [ \ ] ^ ` { | } ~)
[DHCP] Set the DHCP setting. When set to [On], the IP address is assigned to the unit automatically.
To assign an IP address to the unit manually, set to [Off].[IP Address] Enter the IP address of the unit.
This setting is available only when [DHCP] is set to [Off].Note
- Use the ▲/▼ buttons to enter an address in the range 0.0.0.0 to 255.255.255.255 for each segment.
[Subnet Mask] Enter the subnet mask of the unit.
This setting is available only when [DHCP] is set to [Off].Note
- Use the ▲/▼ buttons to enter an address in the range 0.0.0.0 to 255.255.255.255 for each segment.
[Gateway] Enter the address of the gateway.
This setting is available only when [DHCP] is set to [Off].Note
- Use the ▲/▼ buttons to enter an address in the range 0.0.0.0 to 255.255.255.255 for each segment.
[DNS Auto] Set whether to acquire DNS automatically. When set to [On], the DNS server address is automatically acquired.
This setting is available only when [DHCP] is set to [On].[Primary DNS Server] Enter the address of the primary DNS server.
This setting is available only when [DNS Auto] is set to [Off].Note
- Use the ▲/▼ buttons to enter an address in the range 0.0.0.0 to 255.255.255.255 for each segment.
[Secondary DNS Server] Enter the address of the secondary DNS server.
This setting is available only when [DNS Auto] is set to [Off].Note
- Use the ▲/▼ buttons to enter an address in the range 0.0.0.0 to 255.255.255.255 for each segment.
- Enter 1 to 32 valid input characters. The following are valid input characters.
-
When finished, press the [Connect] button.
The unit connects to the Internet.
Hint
- To use “Monitor & Control” or the “Camera Remote SDK” to control the unit from an external device, set [Wireless LAN] – [Remote] to [Enable] on the [Network] status screen.
- Press the [Show Authentication] button on the [Network] status screen to display the authentication information for connecting to the unit. Take care that the screen cannot be viewed and the QR code image cannot be copied by others.
Note
- [Security] (encryption method) can be set to [None], [WPA2], or [WPA3]. The use of [WPA2] or [WPA3] is recommended from a security standpoint. For secure wireless LAN connection, connection to access points with WPA2 or WPA3 security setting is strongly recommended.
- If you connect to an access point without any security setting, you may be subject to hacking, access by malicious third parties, or attacks upon vulnerabilities. Unless it is otherwise unavoidable, connection without any security setting is not recommended.
- When configuring an access point on the [Manual Register] screen, the number and type of characters that can be entered are as follows.
- When entering an SSID:
1 to 32 valid input characters. The following are valid input characters.
Alphabetic characters (uppercase and lowercase), numeric characters, symbols (- . @ _ ( ) ! " # $ % & ' * + , / : ; < = > ? [ \ ] ^ ` { | } ~) - When entering a password:
For WPA2, 8 to 63 valid input characters. For WPA3, 8 to 128 valid input characters. The following are valid input characters.
Alphabetic characters (uppercase and lowercase), numeric characters, symbols (- . @ _ ( ) ! " # $ % & ' * + , / : ; < = > ? [ \ ] ^ ` { | } ~)
- When entering an SSID:
You can check the operating status in the [Status] column of the [Network] status screen.
| Status display | Possible cause | Solution |
|---|---|---|
| [Non Active] | (Mid status transition) | Processing. Wait a moment. |
| [Disconnected] | An access point to connect to is not selected. | Tap [Disconnected] and select a connection destination from the access point list. |
| [Searching] | Searching for a previously connected access point. | To change the connection destination, tap [Searching] and select a connection destination from the access point list. |
| [Connecting] |
|
Check the following.
|
| (SSID name) | (Operating normally) | The unit is connected to the displayed access point. |
| [IP Address Error] | Devices assigned with the same IP address are on the network. | There is an IP address conflict. Check the network settings. |