Connecting using Bluetooth Pairing (Simple Connection)
You can switch to Wi-Fi automatically and connect a control device with the camera automatically by pairing the camera and control device using Bluetooth pairing.
In this connection, the camera becomes a Wi-Fi access point.
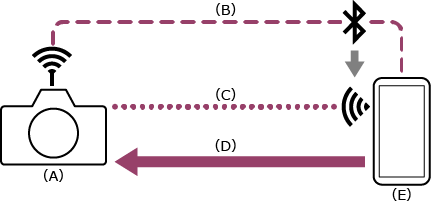
(A) Camera configured as an access point
(B) Bluetooth pairing
(C) Wi-Fi connection
(D) Remote control
(E) Control device on which this app is installed
-
 : Press the MENU (Menu) button to display the menu.
 -
: Select
 (Network) – [Bluetooth] – [Bluetooth Function] – [On].
Bluetooth connections are enabled.
-
: Select (Network) – [Bluetooth] – [Pairing].
Bluetooth pairing is enabled.
-
 : Launch the app and tap
  (App menu) – [Connect].
 -
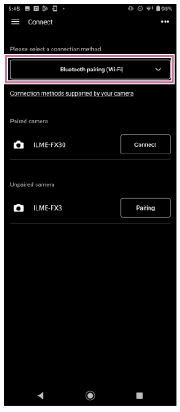
: Select [Bluetooth pairing (Wi-Fi)] on the connection screen.
-
: Tap [Connect] for the camera to connect on the connection screen.
- For paired cameras, the [Monitoring] screen appears when connection is established.
- [Unpaired camera] is displayed for unpaired cameras. To pair an unpaired camera, proceed to the next step.
-
: Tap [Pairing] for the camera to pair on the connection screen.
- A dialog appears on the camera screen prompting you to allow pairing.
-
: Tap [OK] on the camera screen.
- When pairing or Wi-Fi setup is requested by the control device, follow the displayed instructions.
Note
- If an access point (tethering) is enabled on a control device, disable the setting.
- Do not overlook any notifications. For example, if a “Pairing request” pop-up appears on the screen of an Android control device when you tap [OK] on the camera screen, the pop-up will disappear after a few seconds.
- When pairing or Wi-Fi setup is requested by the control device, follow the displayed instructions.
If you have trouble connecting
Refer to the Monitor & Control support page.
TP1001690992