Basic Operation
This topic describes the basic operation for configuring camera settings.
-
Tap
 (Menu) – [Monitoring].
The [Monitoring] screen appears.
Hint
- You can change the resolution of the monitoring screen by selecting high resolution or low resolution. Select
 (Change resolution) to make changes.
 - In multi-camera monitoring, the resolution of the monitoring screen cannot be changed.
- You can change the resolution of the monitoring screen by selecting high resolution or low resolution. Select
-
Select the setting to display/change.
For details about camera functions that can be displayed or changed, see “Supported Cameras, Connection Methods, and Functions.”
-
Check the displayed settings.
-
Change settings using the buttons/control bars as required.
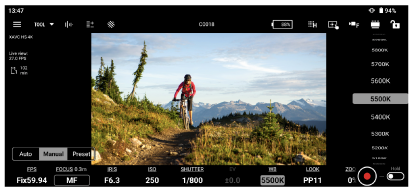
When white balance is selected
- The configurable items will depend on the connected camera. For details, see the Help Guide or operating instructions for the camera.
Common functions on the [Monitoring] screen
Screen area resize
You can change the display area using ![]() (Change screen area).
(Change screen area).
Screen control lock
![]() (Lock): Lock screen control to prevent inadvertent operation.
(Lock): Lock screen control to prevent inadvertent operation.
![]() (Unlock): Unlock screen control to enable operation.
(Unlock): Unlock screen control to enable operation.
![]() (Exposure mode select): Allows you to switch to any exposure mode.
(Exposure mode select): Allows you to switch to any exposure mode.
Note
-
 (Exposure mode select) may not be displayed, depending on the camera.
TP1001691014